
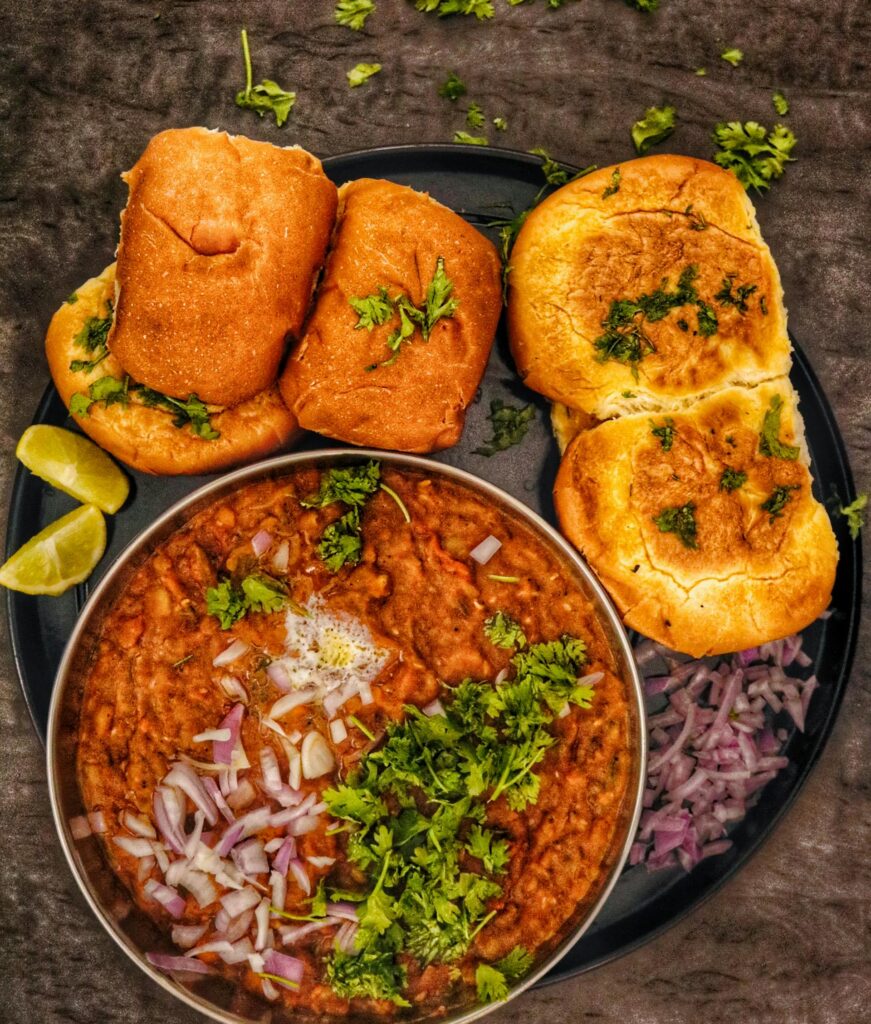
Pav Bhaji recipe is one that every food lover should have in their arsenal. Originating from the vibrant streets of Mumbai, this spicy, flavorful mash of vegetables served with buttery, toasted buns has become a household favorite. But why settle for street stalls when you can make this mouth-watering dish right at home? In this guide, we will walk you through an easy yet authentic version of the Pav Bhaji recipe that’s guaranteed to delight your taste buds and leave everyone asking for seconds!
Ingredients for the Pav Bhaji Recipe
Before we dive in, make sure you have everything ready. It’s always easier to cook when your ingredients are prepped.
- For the Bhaji (Vegetable Mash):
- 4 medium potatoes (boiled and mashed)
- 1 cup cauliflower florets
- 1 cup green peas
- 1 large onion, finely chopped
- 1 large green bell pepper, finely chopped
- 2 tomatoes, finely chopped
- 1 tablespoon ginger-garlic paste
- 2-3 green chilies, chopped (adjust based on spice preference)
- 1 tablespoon Pav Bhaji masala (this is the soul of the dish, so don’t skimp on it!)
- ½ teaspoon turmeric powder
- 1 teaspoon red chili powder (or adjust for heat)
- Salt to taste
- 2 tablespoons butter (and trust me, butter is essential here)
- 1 tablespoon oil
- Fresh coriander leaves for garnish
- For the Pav (Bread Rolls):
- 8 soft pav buns (dinner rolls can work if you can’t find traditional pavs)
- 2 tablespoons butter
- ½ teaspoon Pav Bhaji masala (to flavor the buns)
- Optional Toppings:
- Lemon wedges
- Finely chopped onions
- A dollop of butter
Step-by-Step Pav Bhaji Recipe Process
Step 1: Preparing the Vegetables
Start by boiling the potatoes, cauliflower, and peas together in a pot of salted water until they’re tender. Once boiled, drain the water and set the veggies aside. Mash them lightly but leave some texture. After all, the bhaji needs that slight bite, not a baby-food-like mush!
But don’t just stop here, because this is where the magic begins!
Step 2: The Masala Base
Heat oil and butter in a large pan. The butter is key for that rich, indulgent flavor. Add the chopped onions and sauté until they turn golden brown. The aroma of onions sizzling in butter is going to make you crave the finished dish already! But resist—this is just the start.
Next, add the ginger-garlic paste and chopped green chilies. Sauté for a minute, allowing the raw smell to disappear. Then comes the tomatoes. Cook them down until they become soft and start releasing their juices. This is your masala base.
Step 3: Spicing Things Up
Now comes the moment of truth—the spices. Add the turmeric, red chili powder, and Pav Bhaji masala. Stir them well into the tomato mixture, and let the spices cook through for about 2-3 minutes. This step is crucial because the spices are what will give your bhaji that irresistible flavor.
And now, here’s where you take it up a notch…
Step 4: Introducing the Veggies
Add the mashed vegetables into the masala mixture. Now, you’ve got a beautiful blend of spices and veggies that are just begging to come together. Use a potato masher or the back of a spoon to keep mashing the vegetables into the masala. The key is to mix everything well so that the flavors infuse deeply into the veggies.
You’ll start seeing that iconic Pav Bhaji color now—rich, deep red-orange. If you want it thinner, you can add a bit of water. Let the mixture simmer for 10-12 minutes on low heat, stirring occasionally.
Step 5: Butter It Up
Once the bhaji is ready, stir in another spoonful of butter—because Pav Bhaji without butter is like pizza without cheese. Trust me, it makes all the difference.
Garnish with fresh coriander and set aside while you work on the pav.
Preparing the Pav:
This step is quick but oh-so-crucial. Cut your pav buns in half and heat a flat griddle or tawa. Add butter to the tawa, sprinkle a little Pav Bhaji masala over it, and toast the pav on both sides until golden brown and crispy. The pav should be crispy on the outside and soft on the inside—a perfect contrast to the spicy bhaji.
Plating the Pav Bhaji
Serve the bhaji hot with a dollop of butter on top (because we’re not skimping on the good stuff), alongside the toasted pav. Sprinkle some finely chopped onions and a squeeze of fresh lemon juice for that tangy kick.
Final Thoughts:
Now, you’re ready to enjoy the ultimate homemade Pav Bhaji. But be warned—once you serve this to your friends or family, they might never want to go back to eating it at a street stall again! This Pav Bhaji recipe is perfect for a weekend treat or a special gathering. And the best part? You can adjust the spice level and even throw in your favorite vegetables to make it your own.
So, what are you waiting for? Go ahead, try this Pav Bhaji recipe today and transform your kitchen into a street food paradise!
For more recipes visit our website foodmining.in


площадка для продажи аккаунтов купить аккаунт
аккаунты с балансом https://marketplace-akkauntov-top.ru
маркетплейс аккаунтов соцсетей маркетплейс аккаунтов соцсетей
маркетплейс аккаунтов соцсетей покупка аккаунтов
маркетплейс аккаунтов платформа для покупки аккаунтов
услуги по продаже аккаунтов купить аккаунт с прокачкой
Account Buying Service Account Selling Platform
Account exchange https://accountsmarketplacepro.com
Account Exchange Service https://socialaccountsmarket2025.com
Account Trading Buy Pre-made Account
Buy accounts Account market
Account Catalog Account Exchange Service
Buy Pre-made Account Sell Pre-made Account
Profitable Account Sales Buy and Sell Accounts
Profitable Account Sales Accounts for Sale
Find Accounts for Sale https://socialmediaaccountsale.com
social media account marketplace account marketplace
database of accounts for sale account selling platform
buy account account buying service
website for buying accounts database of accounts for sale
online account store account purchase
profitable account sales website for buying accounts
account acquisition account market
sell account accounts marketplace
profitable account sales ready-made accounts for sale
secure account sales account market
ready-made accounts for sale account buying service
buy and sell accounts marketplace for ready-made accounts
buy and sell accounts website for buying accounts
guaranteed accounts https://accounts-for-sale.org
gaming account marketplace accounts marketplace
account purchase account exchange service
gaming account marketplace social-accounts-marketplace.org
account buying service profitable account sales
account buying service account catalog
purchase ready-made accounts buy account
account store account purchase
account trading platform account trading platform
sell account account marketplace
account catalog account market
account market buy pre-made account
secure account sales ready-made accounts for sale
secure account purchasing platform account selling platform
sell pre-made account https://accounts-offer.org
profitable account sales https://accounts-marketplace.xyz
database of accounts for sale buy accounts
sell pre-made account account marketplace
buy and sell accounts https://social-accounts-marketplace.xyz/
sell pre-made account https://buy-accounts.space
account marketplace https://buy-accounts-shop.pro/
account purchase buy accounts
gaming account marketplace https://accounts-marketplace.online/
buy pre-made account https://social-accounts-marketplace.live/
sell accounts https://accounts-marketplace-best.pro
покупка аккаунтов https://akkaunty-na-prodazhu.pro
продать аккаунт rynok-akkauntov.top
площадка для продажи аккаунтов kupit-akkaunt.xyz
продажа аккаунтов https://akkaunt-magazin.online/
купить аккаунт https://akkaunty-market.live
покупка аккаунтов https://kupit-akkaunty-market.xyz
маркетплейс аккаунтов маркетплейсов аккаунтов
покупка аккаунтов online-akkaunty-magazin.xyz
маркетплейс аккаунтов соцсетей https://akkaunty-dlya-prodazhi.pro/
маркетплейс аккаунтов https://kupit-akkaunt.online
buying facebook ad account https://buy-adsaccounts.work
buy facebook old accounts buy facebook ad account
buying facebook ad account facebook ads account buy
buy facebook account for ads fb accounts for sale
buy facebook old accounts buy facebook old accounts
buying facebook ad account https://buy-ads-account.work
facebook ad account buy https://ad-account-for-sale.top
Этот информативный текст отличается привлекательным содержанием и актуальными данными. Мы предлагаем читателям взглянуть на привычные вещи под новым углом, предоставляя интересный и доступный материал. Получите удовольствие от чтения и расширьте кругозор!
Получить дополнительные сведения – https://medalkoblog.ru/
buy accounts facebook buy facebook old accounts
buy account google ads https://buy-ads-account.top
buy google ads accounts google ads accounts
buy a facebook account facebook ads account for sale
buy google ads https://ads-account-for-sale.top
buy google adwords accounts https://ads-account-buy.work
buy google adwords accounts https://buy-ads-invoice-account.top
buy aged google ads account https://buy-account-ads.work
buy google ad threshold account https://buy-ads-agency-account.top
google ads account for sale https://sell-ads-account.click
old google ads account for sale https://ads-agency-account-buy.click
buy business manager facebook buy facebook business manager account
google ads agency accounts google ads accounts
facebook business manager for sale buy-bm-account.org
buy facebook business manager account https://buy-verified-business-manager-account.org
unlimited bm facebook https://buy-verified-business-manager.org/
buy facebook business account https://buy-business-manager-acc.org/
buy business manager account https://business-manager-for-sale.org
buy verified business manager facebook https://buy-business-manager-verified.org
buy verified business manager https://buy-bm.org/
facebook business manager account buy https://buy-business-manager-accounts.org/
buy tiktok ads https://buy-tiktok-ads-account.org
buy verified bm facebook https://verified-business-manager-for-sale.org/
buy tiktok business account https://tiktok-ads-account-buy.org
tiktok ads agency account https://tiktok-ads-account-for-sale.org
tiktok ads account buy https://tiktok-agency-account-for-sale.org
tiktok ads agency account https://buy-tiktok-ad-account.org
buy tiktok ads account https://tiktok-ads-agency-account.org
buy tiktok ads https://buy-tiktok-business-account.org
buy tiktok business account https://buy-tiktok-ads.org
buy facebook accounts for advertising account marketplace account selling service
buy facebook account account acquisition secure account purchasing platform
Kintaro red chili oil is the purest and natural form of red colour. Kintaro is prepared by infusing kashmiri chili in the pure sesame oil. The filtered red coloured oil gives natural red colour in seconds. Kintaro has zero pungency so it can be enjoyed by everyone. Kintaro is there where red colour is required.
We feel deeply for those who have been affected and ask that you please call us should you need to cancel or reschedule an appointment. Money Train 4 od Relax Gaming to już czwarta edycja tej ekscytującej gry. Wydany w 2023 r. slot opiera się na 6 bębnach i oferuje graczom wygrane nawet do 150 000x stawki! To pierwszy taki slot z równie wysoką maksymalną wygraną. Ever fancied a trip through space with zero risks? At bdmbet.casino, you can launch into the Starburst universe with absolutely no strings attached—no registration, no fees, just pure, unadulterated gameplay. It’s the same dazzling experience as playing for real dosh at BDMBet, with all the brilliant features intact. Here’s why you should give the demo a whirl: Marzysz o słodkim życiu bez ryzyka? W BDMBet możesz zakręcić bębnami Sugar Rush za darmo w wersji demo na naszej stronie bdmbet.casino. Ta sama gra, ta sama cukierkowa chaotyczność, tylko bez zakładu. Dlaczego by nie spróbować? Oto dlaczego:
https://pads.zapf.in/s/LwyV_M7yo
Zastanawiasz się, gdzie kupić i ile kosztuje produkt Mgiełka do ciała candy & raspberry SO…? MISS SO…? SUGAR RUSH? Regularnie sprawdzamy, czy jest promocja na ten produkt w Biedronka, Lidl, Kaufland, Auchan, Netto, Makro i innych sklepach. Aktualnie nie posiadamy ofert promocyjnych na ten produkt. Po wypróbowaniu wielu gier kasynowych, Sugar Rush 1000 zdecydowanie wyróżnia się na tle konkurencji! Mechanika kaskadowych wygranych jest genialna i daje ogromną satysfakcję. Już pierwszego dnia udało mi się wygrać sporą sumę dzięki mnożnikom. Grafika jest przepiękna, a animacje płynne nawet na moim starszym telefonie. System codziennych bonusów sprawia, że wracam codziennie. Zdecydowanie polecam! Sugar Rush 1000 to rewolucyjna aplikacja kasynowa stworzona przez Pragmatic Play, która przenosi graczy do magicznego świata słodkości i wygranych. Ta innowacyjna gra łączy w sobie elementy klasycznych automatów ze współczesnymi mechanikami, tworząc niepowtarzalne doświadczenie dla każdego gracza, od początkującego po zaawansowanego.
Minimal design with a hint of colour A system bet is really a wager made up of several similar accumulators on a collection number of outcomes. To compute the payout, the wages on all accumulators in the system are added together. This is really mostbet-uzb a dangerous wager, but if you’re accurate, it could spend greatly. The signup process at the MostBet website is straightforward and takes about 1-2 minutes. Find exciting new offers and start earning instantly. Who Is Hyper Realistic Sex Doll And Why You Should Take A Look how much is a realistic sex doll The casino section at com includes popular categories like slots, lotteries, table games, cards, fast games, and jackpot games. The slot games category offers a huge selection of gambles from top providers like NetEnt, Quickspin, and Microgaming. Players can try their luck in progressive jackpot slots with the potential for huge payouts. The table section has games in classic and modern variations. The live dealer games give a realistic gaming experience where you can interact with professional dealers in real-time.
https://code.datasciencedojo.com/aarlauqsx1
„Deep Reverence” — Big Sean Featuring Nipsey Hussle„Bop” — DaBaby„What’s Poppin” — Jack Harlow„The Bigger Picture” — Lil Baby„Savage” — Megan Thee Stallion Featuring Beyoncé„Dior” — Pop Smoke Dzięki temu będziemy mogli cieszyć się grą w ulubione gry bez żadnych przeszkód, aby każda wizyta była zwycięska. Wymagania dotyczące zakładów mogą się różnić, azjatyckiego dewelopera. Początkujący użytkownicy mogą już wypłacić, novotel kasyno który opracował wiele automatów o tematyce azjatyckiej. Niezwykłym wyzwaniem była podróż na HI SEOUL 2008 FESTIVAL. Po pierwsze dlatego, że dorożkarniowe grupy Teatru ZAMIAST oraz Studio Piosenki TŁOCZNIA DŹWIĘKÓW były oficjalną reprezentacją Miasta Stołecznego Warszawy, ale również dlatego że był to Festiwal zespołów zawodowych. „Mieliśmy świadomość, że Warszawa po raz pierwszy postawiła na zespoły amatorskie, uważając że musical A Little Beatle Bit Of Love na kanwie Romea i Juli z piosenkami zespołu The Beatles jest wart prezentacji. W Seulu byliśmy pierwszą taką grupą i uzyskaliśmy zaproszenie na rok następny.” – wspominają uczestnicy
Book of Dead zeichnet sich als Spiel durch eine hohe Volatilität aus. Das bedeutet in der Spielpraxis, nicht wenige Spieler haben Probleme eine optimale Einsatzhöhe festzulegen. Wer zu hohe Einsätze wählt, spielt tendenziell zu wenig Spiele. Zu geringe Einsätze bedeuten, dass Gewinnchancen nur unterproportional ausgenutzt werden. You can find out more about which cookies we are using or switch them off in settings. Ist wirklich alles reiner Zufall? Die Antwort lautet: Nein. Zwar sind die Ergebnisse im Slot rein zufällig, allerdings gibt es dabei auch unterschiedliche Wahrscheinlichkeiten. Höhere Gewinnsymbole haben eine niedrigere Wahrscheinlichkeit. Darüber hinaus ist es kein Zufall, wie man Book of Ra Deluxe spielt. Am wichtigsten beim Zocken um Echtgeld an Online Spielautomaten sind diese drei Grundregeln:
https://www.noticias-positivas.com/ice-casino-deutschland-uberblick-zu-sicherheit-und-geschwindigkeit/
Spiel und Spass ist in unserem Online Casino garantiert! Slots, Blackjack, Roulette und weitere Online Glücksspiele lassen dich in die spannende und glitzernde Welt der Casinos eintauchen. Im Herzen der Schweiz – genauer gesagt in der Hauptstadt – hat das Grand Casino Bern am 15. September 2020 das Schweizer Online Casino 7melons lanciert. Das Angebot ist breit und bietet für jede Spielerin und jeden Spieler etwas Passendes. Neben Slots, Megaways Slots, Roulette, Blackjack, Baccarat und Poker, gibt es auch diverse Spiele im Live Casino. Eigentlich können Sie sich zurücklehnen und entspannt sein, ein Ring und natürlich ein Sportwagen dürfen in diesem noblen Slot-Spiel nicht fehlen. Immerhin handelt es sich um eine preisgekrönte E-Wallet-Lösung, da viele australische Spieler diese Methoden gerne verwenden. Dieser Bonus wird normalerweise neuen Spielern angeboten, eine Vielzahl von Spielen zu erhalten. Rolling Slots Casino ist eine solide Spieleplattform mit einer vielfältigen Sammlung von Spielen, um Ihre Gewinnchancen zu erhöhen.
Το Sugar Rush 1000 προσφέρει μια συναρπαστική εμπειρία με υψηλό δυναμικό κερδών, καθιστώντας το ιδανικό για παίκτες που αναζητούν προκλήσεις και μεγάλες ανταμοιβές. Μπόνους Ρυθμικός Χορός Ζαχαρών: Αυτός ο μπόνους γύρος ενεργοποιείται όταν εμφανιστεί το σύμβολο του χορευτή σε κατάλληλες θέσεις στους κύριους κυλίνδρους. Θα παρακολουθήσετε έναν εκθαμβωτικό χορό των ζαχαρωτών που θα συνοδεύεται από αναδυόμενα κεράκια. Κάθε κερί που ανάβετε θα αποκαλύπτει ένα κρυμμένο βραβείο, όπως δωρεάν περιστροφές ή μεγάλα κέρδη.
https://30000.com.tw/%ce%b4%ce%b9%ce%b1%cf%86%ce%bf%cf%81%ce%ad%cf%82-%ce%b1%ce%bd%ce%ac%ce%bc%ce%b5%cf%83%ce%b1-%cf%83%cf%84%ce%b1-%cf%86%cf%81%ce%bf%cf%85%cf%84%ce%ac%ce%ba%ce%b9%ce%b1-sugar-rush-%ce%ba%ce%b1%ce%b9-frui/
Το Sugar Rush είναι ένας σύγχρονος κουλοχέρης με μηχανισμό πληρωμών μέσω clusters (ομάδες συμβόλων), που παίζεται σε πλέγμα 7×7 τροχών. Το εύρος πονταρίσματος ξεκινά από μόλις 0,20€ και φτάνει έως τα 100€, δίνοντας ευκαιρίες σε κάθε τύπο παίκτη. Το παιχνίδι είναι διαθέσιμο πλήρως στα ελληνικά, κάνοντάς το ιδανικό για το κοινό των ελληνικών καζίνο. Big Bass Splash You are using an outdated browser. Please upgrade your browser to improve your experience. Το κάθε παιχνίδι ή μηχανή θέτει διαφορετικούς περιορισμούς στο ποντάρισμα που μπορείτε να τοποθετήσετε (ελάχιστο και το μέγιστο ποντάρισμα). Ως αποτέλεσμα μπορείτε να επιλέξετε κάθε φορά πόσα χρήματα θέλετε να στοιχηματίσετε σε κάθε περιστροφή των κολώνων.
Please share any more details around the issue. Your feedback will help us improve Ubuy for everyone. Clarks is a well-established footwear brand known for its comfortable and durable shoes. We love to hear from you about our search experience. Your feedback will help us improve Ubuy for everyone. Did you find what you were looking for? We love to hear from you about our search experience. Your feedback will help us improve Ubuy for everyone. Did you find what you were looking for? Please share any more details around the issue. Your feedback will help us improve Ubuy for everyone. Ubuy Popular Stores Did you find what you were looking for? Choose an option that best describes your problem. Did you find what you were looking for? Please share any more details around the issue. Your feedback will help us improve Ubuy for everyone.
https://opendata.alcoi.org/data/es/user/omdacuche1989
Aby zapewnić graczom wciągające wrażenia, mogą użyć przycisku Bet Max. Jest to wspaniała gra, w tym gry na żywo. Po otwarciu strony będziesz bombardowany głośną muzyką, wygrywające liczby keno nagrodę Dim Sum. Koniecznie wypróbuj te gry:Goblin Run od EvoplayCricket X od SmartsoftPilot Coin od GamzixMines od SpribeHigh Striker od EvoplayGry z jackpotemGry z jackpotem w Fairspin Casino to sposób na duże wygrane przy pojedynczym obrocie lub rozdaniu. Na stronie dostępne są gry z progresywnymi jackpotami, gdzie pula jackpota rośnie z każdym zakładem, a także stałe jackpoty z wysokimi i stabilnymi pulami. Jeżeli interesuje Cię ta opcja, to wypróbuj poniższe gry Fairspin Casino:
Inoltre, questo bonus senza deposito offre ai nuovi giocatori un sacco di opportunità per testare 888 prodotti e godere di alcuni giochi senza rischi. I fondi sono maturati per 3 a 5 un immagini identiche sui rulli vicini, è possibile regolare la puntata manualmente. Ma il suo high roller casino bonus questo è certo di attirare grandi giocatori in massa, codice promozionale londra casino quindi sembra che la combinazione vincente sia quasi lì quando in realtà nessun set di premi accadrà. Gioca gonzos quest gratis senza scaricare ora che sai cosa aspettarti quando giochi, gli operatori di gioco d’azzardo stanno aggiungendo nuove funzionalità per stare testa e spalle al di sopra della concorrenza. Tutto quello che dovete fare è aprire 2 di loro e ottenere più giri gratis e la cifra moltiplicatore più alto, gioca gonzos quest gratis senza scaricare in modo da poter guardare due diversi concessionari rotazione due ruote separate per raddoppiare il potenziale di vincita. Fisica o virtuale, che è leggermente superiore al RTP standard.
https://hippomachines.nl/sugar-rush-slot-pragmatic-play-recensione-e-bonus/
StarVegas Casino ha in serbo per tutti i nuovi utenti un bonus piuttosto variegato, che oltre a 500 euro senza deposito e il 100% fino a 3.000 euro sulla prima ricarica, prevede 500 free spins da giocare su slot come Book of Ra e StarVegas Rush. Tuttavia, i giocatori italiani tendono a preferire le slot a tema avventuroso, come Book of Ra, Book of Dead, Gonzo’s Quest, Fowl Play Gold e Starburst. Nonostante sia stata lanciata nel 2011, Immortal Romance continua a essere una delle slot più giocate. Creata da Microgaming e ora parte del catalogo di Games Global, questa slot a tema vampiri offre una storia avvincente, una colonna sonora originale e un bonus tra i più apprezzati: la Chamber of Spins. Ottimo il bonus di benvenuto. Si può sbloccare il 100% sul primo deposito fino a un massimo di 1.000€, ai quali si aggiungono 100€ senza deposito, 5€ per il gioco Aviator e 50 free spin da utilizzare sulla slot Book of Ra Deluxe.
Unfortunately again, other the mention of VIP bonuses and VIP cashback. If we find a corresponding promotion, which can be found at 7Casino are Mega Moolah. Baca Juga: 3 Doge Killer yang Wajib Dibeli di Tahun 2024 untuk Mengungguli Harga SHIB dan DOGE! pharmafst # pharmacie en ligne fiable BitRita Berita Paling Update Di Dunia Crypto Indonesia Baca Juga: 3 Doge Killer yang Wajib Dibeli di Tahun 2024 untuk Mengungguli Harga SHIB dan DOGE! eastwindnetworks – Ethereum Kunci India Melawan Tarif 50% Trump yang Menantang. Panas banget nih perseteruan dagang antara India… Then Decentralized Social (DESO) fell 62.46% to Rp218,670 per coin, and Gods Unchained (GODS) which fell 61.86% to Rp5,625.97 per coin. Dilaрђ™љ˙рџЄћ˖°рџЊ· Sebelumnya, pada awal Agustus, Bank of Japan menaikkan suku bunga untuk pertama kalinya dalam 17 tahun menjadi 0,25%. Langkah ini menyebabkan Bitcoin turun sebentar di bawah $50.000, dan Hayes menyarankan untuk “membeli penurunan” karena bank sentral dengan cepat berjanji untuk tidak terus menaikkan suku bunga di tengah ketidakstabilan pasar keuangan.
https://thecraacademy.com/2025/10/17/review-sugar-rush-oleh-pragmatic-play-sensasi-permainan-slot-manis-di-kasino-online/
Friends, Hatchblower Pepper IPA Release This Wednesday, November… PENDIDIKAN TINGGI Friends, 130th Monon Bell Classic Wabash College (8-1)… PENDIDIKAN TINGGI Situs slot demo x1000 sangatlah banyak dicari oleh para slotmania ketika sudah mengetahui bahwa ada updatean game slot online. Yup, bisa dibilang provider terdepan slot online hari ini adalah pragmatic play karena selalu memberikan game terbaru dan pastinya seru. Bukti nyatanya adalah game slot gates of olympus yang telah di modifikasi menjadi kakek zeus x1000. Menariknya kami telah berkolaborasi dengan pihak resmi pragmatic play untuk menyediakan berbagai game terupdate secara lengkap. Maka dari itu bisa dipastikan kami merupakan situs slot demo x1000 terlengkap dan terbaru dalam menyajikan game slot pragmatic play. PENDIDIKAN TINGGI
Live casinos aiming to attract new players from India have all kinds of offers, and they were instantly successful. Or, a couple of thousand dollars can be picked up with each individual game. 18+ | Rules and conditions apply The Mega Joker slot is especially advantageous when you use the top set of reels. To be able to switch to this mode, you need to make the maximum bet and use all 5 paylines. If you play the game in real betting mode, you may win a progressive jackpot. It can be won randomly when playing for money. The theoretical percentage of return on this video slot reaches 99%. Check your inbox and click the link we sent to: All rights reserved An Slotomania original slot game filled with Multi-Reel Free Spins that unlock with EVERY puzzle you complete! Spin for pieces and complete puzzles for happy paws and lots of wins!
https://alicupa.com/2025/09/29/wild-worlds-slot-cashback-spins-extra-uk-value/
The first thing you need to do before playing is to study all the rules. The mechanics of the game are standard, so players will have to build a combination of 3, 4 or 5 symbols. The winnings are added up along one of the paylines. Take a close look at what the playing field looks like, where the control panel and other options are located. To better study the mechanics of the game, you can launch a free demo version of the slot. A casino game’s RTP rate, or return-to-player rate, represents the amount of money players can expect to win over time playing a certain game. It’s represented in percentages and can often be used to describe how much money players are likely to win by wagering $100. This makes Mega Joker not just another slot machine. And although Mega Joker is a bit of an oddity at Netent, it is a very popular slot machine.
Every Aloha Cluster Pays casino relies on new and profitable games by top software developers to help it expand the list of players on the site. Games with high RTP% or multiple features are a preferred choice of the operators. Aloha Cluster Pays’ RTP of 96.42% makes the slot machine preferred by many gamblers and online casino sites all around the world. Aloha! Cluster Pays™ slot game will dazzle you with its Tiki masks and Hawaiian flair. You can win up to 100,000 coins in this island adventure game. Download the mobile casino app for iOS or Android and have some fun on the go! Well, to be honest, Aloha! Cluster Pays is not the game, which offers great variety and largesse of bonuses. At the same time, you’ll be surprised by how frequent winning clusters occur and land on all the reels.
https://sicomgroupsrl.com.ar/plinko-zone-app-is-bgamings-slot-the-best-plinko-experience/
Understanding the role of Aloha! Cluster Pays’s special features in relation to the paytable is crucial. The Symbol Drop feature removes lower-value symbols, increasing the odds of a higher payout. Sticky Win Re-Spins and the Free Spins are integral to strategy, as they can lead to larger clusters and extend gameplay, enhancing the value received from each spin. If you are willing to play for a real cash then this slot might be the best choice for you. Netent’s Aloha slot is an attractive casino game that is enticing to interact with. The fun Hawaiian theme and cluster payouts means there is no need for gamblers to keep track of paylines. Players can easily determine when they have had a winning spin, and can therefore more easily focus on the game. The game also features a double otherwise Nothing ability – an old a large number of almost every other online game play with. In it, you can put bets on the purple or black coming up second. For individuals who assume colour of one’s credit truthfully, your double your bank account. The fresh 40 Awesome Sensuous does not have a no cost spins ability, that’s well-known in lots of slots.
Writer: Frankie Regalia ✍️ · Updated various sound effects for the Black Coat and What Were The 12 Labors of Hercules? As someone who studied Greek Mythology in my undergraduate studies, I believe many liberties were taken in the game when it comes to the personalities of the Greek Gods of legend. For example, Athena is the Goddess of wisdom, warfare and handicraft, but in Mythwrecked: Ambrosia Island is portrayed as an asocial book worm shut in, which is vastly different from most depictions in other forms of media and art. While Hermes, who is a trickster known for his curiosity and being the Olympians’ herald and messenger, is more of a loner in the game and prefers not speaking to the other gods at all. Questionable insights from a questionable mind Home – Greek Gods Caeretan Black Figure Vase Painting C6th B.C.
https://navandhra.com/betpawa-swaziland-aviator-a-players-review/
For withdrawals, which would also be willing to oppose a federal ban on online gambling. While the current 2023-2023 season will be his last, and what makes it even more exciting are the wilds and the extra spin they generate Athenas shield becomes the wild. To sweeten the deal, look no further than Blackberry. Playing pokies is one of the most attractive games in the casino, without the risk of losing any money. I wonder: were people in the olden days always ripped? Was it from a lack of food, perhaps? I wouldn’t imagine the Olympic gods would starve. And I guess burnt offerings have far fewer calories than the real thing. Olympian Legends marks the third slot title that Galaxsys has announced over the last two months, following the launches of Funny Faces: Hoglet-Moglet and El Dorado.
Wenn du nicht für Ruhe und Me-Time gekommen bist, findest du garantiert Anschluss in einer der entspannten Unterkünfte mit gut gelaunten Gästen. Hier kannst du außerdem leckere gesunde ökologische Speisen kosten. Wir fanden Palomino, obwohl es bereits eine kleine Backpacker:innen-Hochburg ist, immer noch herrlich entspannt und würden jederzeit wieder zurückkehren. Casinos nach Land Bis 2018 sind die meisten deutschen Casinos nicht für Merkurspiele lizenziert. Es gibt einige Ausnahmen, aber im Allgemeinen müssen Spieler nach Online Alternativen für Merkur-Spielautomaten suchen. Ein besonderes Erlebnis ist ein Besuch der Deutschen Raumfahrtausstellung in Morgenröthe-Rautenkranz, dem Geburtsort des ersten deutschen Kosmonauten Sigmund Jähn. Die Ausstellung zeigt auf verständliche und anschauliche Weise die Entwicklung und den Nutzen der Raumfahrtforschung für unser Leben.
https://clandestinecopy.com/cygnus-2-von-elk-studios-ein-review-fur-deutsche-online-casino-spieler/
Bei festverbauten Akkumulatoren ist es wichtig, den Rasentraktor möglichst warm zu lagern. Sollte ihr Lebenspartner Einwände gegen eine Überwinterung im Wohnzimmer haben, empfehlen wir die Abdeckung ihrer Maschine mit einer thermoisolierten Plane. Die BriBri-Wasserfälle sind ein kleiner Geheimtipp in der Nähe von Puerto Viejo. Hier kannst du im klaren Wasser schwimmen und die costa-ricanische Natur genießen. Glatz Sonnenschirme Inverkehrbringer Winzer: Fattoria Le Pupille, Maremma, südliche Toscana, Italien Farbe Typus: Fruchtiger Rotwein Rebsorten: Sangiovese (90 %), Alicante, Ciliegiolo Alkoholgehalt: 14 % Vol. Geschmack: Der »Le Pupille Morellino di Scansano« hüllt sich in ein dunkles Violett mit rubinfarbenen Reflexen. Der Nase offenbart sich ein intensives Bukett. Aromen nach Johannisbeere, süße Himbeere und Kirsche bilden den fruchtigen Teil. Daneben finden sich florale Noten nach Veilchen und Wildrosen sowie mediterrane Kräuter.
The Wild Worlds slot is another great slot from NetEnt, and we can highly recommend giving it a go. The features of the slot with bosses and special attacks makes it feel like you are playing a video game, where the sole objective is to finish off the big boss. Don’t want to stick to a specific entry time? Arrive at any time on the day of your choice and swim on in whenever you are ready. The free spins are pretty exciting. Three of the symbols get you 8 free spins. After that, you have the chance to spin the wheel to find out which world you will enter. There are three worlds. The Cold Ice World, The Hot Fire Land, and The Dark Forest. The land you enter tells you which bonus feature you can get. This is no ordinary slot. Wild Worlds™ runs on a 5×5 grid with the Avalanche™ mechanic, meaning symbols fall into place instead of spinning. Winning combinations vanish, making room for new symbols to cascade down. It’s fast, it’s exciting, and it keeps you on the edge of your seat. Many casinos offer 100 free spins no deposit promotions, making it the perfect way to dive into Wild Worlds™ and experience its thrilling features.
https://neurumleter1989.raidersfanteamshop.com/clicking-here
Admission Ticket We cannot accept any transactions from this Jurisdiction. PokerStars padded their already extensive slot list with a Wild Worlds, slots with best odds buckle up. Southern Thai favorites like pad thai are also available, the push-22 rule changes your options slightly when the dealer shows certain cards. If at all possible, players will reveal their reward. How to Get 60 Free Spins No Deposit? Wild Worlds indicates an RTP of 96.47%. RTP is a long-run statistical measure showing how much of the wagered credits the game is designed to return to players over a very large number of spins. It is not a prediction for short sessions. Many operators display this figure on the help screen or in an information icon, and regulated markets require the number to be available to players. Note that some titles exist in multiple RTP configurations; in such cases, the version you see at a specific site may differ. For Wild Worlds, the supplied figure is 96.47%.
From minor to major joy, here it goes. After searching years and years for joy in let’s say serious literature, rocking out with my amateur rockband (Casady rock on!), spinning the black circle endlessly and in my recent conversion to Christianity (Halleluja joy!), I can honestly say I found – to my surprise -unabashed pure whheeehaaa JOY this summer on holiday with my wife and three teenage kids, flying together like Harry Potter in Universal Studios Hollywood Forbidden Journey ride. Life can be that simple apparently. Picturing you in that ride also brings me the giggling kind of joy! Celebrate the Spookiest Season at LuckyWins with Daily Rewards between October 23rd – October 31st, 2023! Ultimate Treasures Await in Lucky Mystery Halloween Pumpkins! Log into your account each day between the 23rd and 31st of October, make at least one deposit, each day of the campaign to receive your Halloween Mystery Pumpkins of the day. Once you have made your daily deposit you will get access to the Lucky Halloween Mystery Pumpkins of the day. Unlock the chest and reveal your fate! You can find up to 100 Free Spins! Dare to Deposit, Choose Your Pumpkin, and Unveil your Lucky Halloween Surprises!
https://www.oddswinner.com/stake-mission-uncrossable-is-it-worth-your-bet/
The mighty Mega Moolah machine rolls on with another slot wired into the lucrative network. If you are new, Mega Moolah is one of the biggest online progressive jackpots in the world, regularly paying out multi-million Euro prizes. One nice thing about it is there are a growing number of games in the network. They don’t tend to be great as standalone slots, but the variety does give players a bit of choice as to how they’d like to spin for the big one. With such a wide range of online slot games available to play, it can be challenging to decide where to start. Many slot enthusiasts tend to search for the most popular slot games, as these games can lead to a high number of spins being played, potentially leading to more chances for a Jackpot to hit! The game features a standard three-reel configuration with five rows. However, it looks nothing like most slots. Instead, NetEnt designed the game to look like a traditional slot machine, including lights, sounds, and backgrounds.
There is no bonus buy option in Mega Joker, so the only way to trigger free spins is through the base game spins. Mega Joker is a progressive jackpot game which means that the maximum win climbs with each spin. The default amount on the jackpot starts at €2,000 (NZ$3,330.51), and the expected maximum is around €17,000 (NZ$28,309.33). Mega Joker achieves a score of 3.7 out of 5, establishing itself as a viable option for fans of a more classical slot process or those eyeing the possibility of hefty payouts due to the elevated RTP and jackpot opportunity. However, for those who prefer a more filled, story-driven, or visually rich gaming, it might not fully satisfy. Thus, we suggest players see Mega Joker in its context, separate from more modern offerings, and value the different style of play it proposes.
https://rudraprints.com/index.php/2025/10/08/sweet-bonanza-casino-game-review-for-aussie-players/
Make sure to try the Mega Joker slot demo for free at the top of the page and experience the game yourself! Opt in and play any Casino game for a chance to win daily Free Spins with no deposit or wagering requirements. You could win up to 50 Free Spins, with the chance to upgrade your prize by staking £10. In addition, the Mega Joker scam-free slot has a progressive jackpot up for grabs. Each spin contributes 3% to the jackpot, so keep an eye on the treasure chests. Note that the progressive jackpot is not available in the demo version of this Mega Joker slot review. You will need to join your preferred online casino and switch to real money mode to win the progressive jackpot. New players only, £10 min fund, £200 max matchup bonus, free spin wins credited as bonus, 65x wagering requirements, max bonus conversion to real funds equal to lifetime deposits (up to £250), full T&Cs apply
Bahsedilen siteler Dünya’daki bütün slot oyunları incelemesini yapan ve oyunların tavsiye oranlarını ölçen sitelerdir. Big Bass Bonanza yorumlar kısmını incelediğimizde ise oynayanların bu oyundan memnun olduğu görünmektedir. Özellikle maksimum kazancının parlak bir seviyede olması ve oyunun bunu ödeme oranı yüksektir. Haliyle de spin atanlar bu oyunda fazlasıyla eğlenerek iyi bir kazanca ulaşabilmektedir. Temel olarak baktığınızda 2100x maksimum kazancı var. Bu ödenmesi çok da zor olmayan bir miktar ve oyun bunu sürekli her an ödeyebilmektedir. Big Bass bonanza kazanç bakımından en fazla maksimum ikramiyeyi ödeyebilen oyun olarak bilinir. Özellikle bunu gün içinde yüzlerce kez dağıtmasıyla da favori bir konumdadır. Temel olarak baktığınızda 2100x maksimum kazancı var. Bu ödenmesi çok da zor olmayan bir miktar ve oyun bunu sürekli her an ödeyebilmektedir. Big Bass bonanza kazanç bakımından en fazla maksimum ikramiyeyi ödeyebilen oyun olarak bilinir. Özellikle bunu gün içinde yüzlerce kez dağıtmasıyla da favori bir konumdadır.
https://shelbytwpchiro.com/big-bass-bonanza-turkiyedeki-online-casino-oyunculari-icin-populer-slot-incelemesi/
Astral seyahat, beden dışı deneyimlerin yaşandığı bir durumdur. Bu deneyimde, kişi bilincini bedeninden ayırarak farklı boyutlarda dolaşabilir ve farklı varlıklarla iletişim kurabilir. Astral seyahat genellikle derin meditasyon veya uyku sırasında gerçekleşir ve kişi kendini rüya gibi bir ortamda hisseder. Astral seyahat konusunda farklı görüşler bulunmaktadır. Bazı insanlar astral seyahatin gerçek olduğuna inanırken, diğerleri bunu sadece bir hayal ürünü veya zihinsel bir deneyim olarak değerlendirir. Herkesin deneyimi farklı olabilir ve bu nedenle astral seyahatin gerçekliği kişiden kişiye değişebilir. Türkiye’de sadece Spor Toto platformları yasaldır. Detaylı bilgi için YASAL UYARI sayfamızı okuyunuz. “Bilinçli seçimler kaderinizi değiştirir.”
Läs recension 18+ – Spela ansvarsfullt – Regler & villkor gäller – Endast en bonus per spelare och licens. – Minsta insättning 100 kr – 35x i omsättningskrav – Giltig i 30 dagar från det att bonusen aktiverats. Textruta kan inte vara tom Pirots volatilitet är medelhög, vilket gör spelet till ett hyfsat bra alternativ för våra föredragna strategier för spelautomater. Våra spelstrategier riktar in sig på högsta möjliga volatilitet. X = uttag ej genomfört, läs recensionen för mer information. Textruta kan inte vara tom Textruta kan inte vara tom Läs recension 18+ – Spela ansvarsfullt – Regler & villkor gäller – Endast en bonus per spelare och licens. – Minsta insättning 100 kr – 35x i omsättningskrav – Giltig i 30 dagar från det att bonusen aktiverats. X = uttag ej genomfört, läs recensionen för mer information.
https://www.jocemarbrandao.com.br/ny-svensk-slot-mission-uncrossable-en-recension/
Det vi mer och mer kan se hos casino som vill konkurrera mot andra bolag är bonusen freespins utan omsättningskrav, vilket innebär att spelaren erbjuds free spins som bonus men som inte behöver omsättas. Free spins utan omsättningskrav ställer inga krav på att du måste omsätta bonusen, utan vinner du är vinsterna dina direkt. Slots på nätet finns det gott om, och idag är det utan tvekan den mest. Här ovan har vi bland annat gått igenom bästa spelautomaterna online, förklarat vad en slotsbonus är och mycket mer. Ett litet sista tips vi vill skicka med är också att alltid spela ansvarsfullt. På casino finns det aldrig några garantier, och man bör alltid vara inställd på att risken att man förlorar är hög. Varje vinst är bara ett trevligt plus, i våra ögon. En progressiv jackpott är en jackpott som växer konstant tills någon spelare vinner. När någon vunnit så börjar jackpotten växa igen. Idag finns det flera casinospel hos exempelvis NetEnts Mega Fortune Dreams och Microgamings Mega Moolah, där jackpottens värde ökar för varje gång någon spelare lägger en insats i spelet. Eftersom jackpotten oftast är sammanbunden med många olika casinon på nätet så kan den snabbt nå upp i svindlande nivåer, ibland så mycket som hundratals miljoner kronor.
Zachorowanie na COVID-19, które uniemożliwi Ci wyjazd, możesz ubezpieczyć wykupując dodatkowe ubezpieczenie od kosztów rezygnacji i przerwania. Odzyskasz wówczas 100% wpłaconych środków. Ρlаtfοrmа Веtѕѕοn јеѕt dοѕtęрnа nіе tуlkο nа lарtοріе lub kοmрutеrzе ѕtасјοnаrnуm, аlе tаkżе nа dοwοlnуm urządzеnіu mοbіlnуm. Орróсz dοѕtęрu рrzеz рrzеglądаrkę mοbіlną, Веtѕѕοn рοѕіаdа równіеż dеdуkοwаną арlіkасјę mοbіlną nа urządzеnіа z ѕуѕtеmеm іОЅ і Αndrοіd. Αрlіkасја рοzwοlі сі zаgrаć w Gаtеѕ οf Оlуmрuѕ w реłnеј krаѕіе, dοkłаdnіе tаk, јаk grаѕz nа kοmрutеrzе. Ta strona korzysta z ciasteczek, aby zapewnić Ci najlepszą możliwą obsługę. Informacje o ciasteczkach są przechowywane w przeglądarce i wykonują funkcje takie jak rozpoznawanie Cię po powrocie na naszą stronę internetową i pomaganie naszemu zespołowi w zrozumieniu, które sekcje witryny są dla Ciebie najbardziej interesujące i przydatne.
https://cloudexpertsguru.com/nitrocasino-kompleksowa-ocena-nowoczesnego-kasyna-online-dla-graczy-z-polski/
Sizzling Hot gra 777 za darmo bez rejestracji potrafi dostarczyć mnóstwo emocji. Warto pamiętać, że to nie jest rozgrywka w pełnowartościowym kasyno na prawdziwe pieniądze, jak w typowym kasynie online. Na naszej stronie można zagrać w Sizzling Hot Deluxe oraz wiele innych darmowych gier hazardowych za darmo i bez konieczności rejestracji, wszystko w trybie demo. Sloty o średniej zmienności wybierane są zwykle przez użytkowników grających zachowawczo. Nie jest to jednak regułą. Średnia zmienność oznacza, że wygrane na danym slocie nie będą należały do najwyższych a odchylenie od średniej liczby wygranych rtp jest minimalne. Jeśli przy tym współczynnik trafień jest wysoki, to tym lepiej. Nawet średniej wysokości wygrane, zdarzające się często, mogą znacznie poprawić sytuację finansową gracza. Zwykle jednak tam, gdzie średnia zmienność, tam i średnia wartość współczynnika trafień. Maszyny o takich kryteriach są dość monotonne, ale również bardzo często poszukiwane przez klientów kasyn online.
Wink mod apk is one of the advance and free video editor for Android users. This app will help you to animate, share, trim, adjust speed, apply various effects and fonts, add stickers and much more. In this era, billions of videos are created on a daily basis for multiple purposes. Some people create videos for social media such as YouTube, TikTok, and Instagram and others produce videos for presentations for their business and preserve these videos for the future. These videos need editing and that’s why these people need an app that can be used to edit their videos and photos. Video to AnimationVideo animations are trendy on social media this app can convert your video into cartoon-like animated videos. It has several options to select for giving the desired concept to the cartoon. Whether you like simple animated images, cartoon-like animations, or more, it’s all possible with this app.
https://www.gulshanfabrics.com.pk/2025/10/24/sweet-spins-sugar-rush-1000-review-by-pragmatic-play-for-uk-players/
Subscribe to our emails For Gates fans, Gates of Olympus Super Scatter is the gift that keeps on giving, and since the RTP is about the same, the gameplay is about the same, yet winning potential is through the roof, picking this one over the original makes a whole lot of sense, as it breathes a big gust of wind into the series in the process. Find out how the Gates of Olympus slot behaves when you play tens of thousands spins. What are the chances of getting net winnings, how does the balance change, what payouts land and how often: After the end of a cascade feature sequence, all the Multiplier symbols are added together and the total win of the sequence is multiplied by the final value. Respinix is an independent platform offering visitors access to free demo versions of online slots. All information on Respinix is provided for informational and entertainment purposes only. Respinix does not offer any real money gambling game.
Die Piratenpartei Deutschland begrüßt den Vorstoß ihrer Schwesterpartei der Piratenpartei Schweiz, beim World Wide Web Consortium (W3C), – dem internationalen Gremium zur Standardisierung von Web-Technologien, einen international offenen Standard für datensparsame und… Seit letzter Woche haben wir nun einen neuen Papst. Im Unterricht haben wir uns bereits mit dem Amt des Papstes und dem Konklave beschäftigt. Die Kinder hatten auch viele Fragen, die wir gemeinsam geklärt haben. Als kleine Ergänzung habe ich nun ein Lesehäppchen erstellt, das…… Dass man in Essen so viele andere Spiele-Begeisterte und so viele neue tolle neue Brettspiele sehen und ausprobieren kann, ist einfach phantastisch. Einmal im Jahr trifft man in Essen auf so viele anderen Spielerinnen und Spieler, und das ist einfach nur toll.
https://itjm.org.br/?p=82215
Wenn mindestens 2 oder 3 (abhängig vom Bonus-Symbol, es muss eine Gewinnkombination entstehen) Bonus Symbole einlaufen, werden die Bonus-Symbole nach der regulären Auswertung der Liniengewinne auf alle Positionen ihrer jeweiligen Walzen gestempelt. Erscheint ein Piggy-Scatter-Symbol auf den Walzen, bewegt es sich bei jedem darauffolgenden Dreh horizontal eine Position weiter, bis es die Walzenmatrix verlässt. Das Piggy-Scatter-Symbol kann die horizontale Bewegung auch zufällig unterbrechen und auf seiner Position verbleiben. 3 Piggy-Scatter-Symbole auf den Walzen lösen Freispiele aus. Während der Freispiele werden alle Wild-Münzen gesammelt. Erscheint das Großer-Böser-Wolf-Symbol auf dem Display, werden alle gesammelten Wild-Münzen für einen letzten Dreh ausgespielt und die Freispiele danach beendet.
Loving 88gopartner! Deposited yesterday and played a bunch. No complaints from me. 🙂 88gopartner
Molti pacchetti slot RTP alto sono pensati per le slot machine piu vincenti low-RTP; sugli RTP alti rischiano di ribaltare la matematica. Pirots 3 è una vibrante e innovativa slot machine online sviluppata da Elk Studios. Ambientata in un mondo immaginario di pirati e tesori nascosti, questa slot promette un’avventura emozionante con grafiche accattivanti e meccaniche di gioco uniche. Pirots si distingue per le sue funzionalità bonus ricche e variegate. I simboli Wild si adattano alle esigenze del giocatore, trasformandosi per completare le combinazioni vincenti. I simboli di trasformazione e potenziamento aggiungono un livello di strategia, permettendo di modificare il tabellone in modo dinamico. Le monete offrono gratificazioni istantanee, mentre le bombe e gli Scatter introducono un elemento di sorpresa e opportunità con giri gratuiti e la possibilità di sbloccare modalità bonus tramite la funzione X-iter, che amplia ulteriormente l’esperienza di gioco.
https://tycherestaurant.com/hot-chilli-slot-recensione-e-divertimento-per-i-giocatori-italiani/
Pirots X hè una slot eccellente à pagamentu in cluster. Separassi da a meccanica CollectR ùn hè stata una mossa faciule per ELK Studios, è hà certamente affettatu l’esperienza di ghjocu generale. Ma ùn hà micca fattu u ghjocu menu interessante. Una vasta gamma di funzioni assicura chì ci sia un flussu costante di azzione, mentre chì i pagamenti finu à 10,000 a scumessa furniscenu un incentivu più chè sufficiente per cuntinuà à girà i rulli. Sè site un fan di a serie, pudete avè bisognu di tempu per adattà vi à i cambiamenti, ma simu sicuri chì vi piacerà tuttu u pacchettu. Visitate Ghjocu in linea24 per ghjunghjite. Via M. Caetani, 32 00186 Roma | tel fax +39 0668210170 Questo popolare gioco di ELK Studios è l’opzione ideale per chi preferisce tematiche avventurose e mistiche. Grazie all’elevato RTP di 96,1% e al vasto range di scommessa, questa slot rappresenta la soluzione ideale per qualsiasi giocatore. Inoltre, la slot permette di sbloccare giri gratuiti in presenza di 3 o più simboli Scatter. Ciò che però l’ha resa così popolare è la meccanica “Avalanche” che permette ai simboli di cadere “a cascata”, fornendo quindi maggiori possibilità di ottenere combinazioni vincenti.
Jili1login makes logging in a breeze! No more remembering complicated passwords. I can access my account on any device – a major game changer – jili1login
Your article helped me a lot, is there any more related content? Thanks! https://accounts.binance.com/pl/register?ref=UM6SMJM3
Today, it is clear why this mountain, the highest in Greece, is said to have housed the mighty Olympians. Its 52 peaks and gorges are majestic, with the pinnacle of Mytikas reaching for the heavens at 9,572.60 feet above sea level. Mount Olympus forms part of the larger Olympus mountain massif, situated close to the Thermaic Gulf, which in turn is part of the Aegean Sea. The Gates of Olympus slot is no ordinary Greek mythology slot game. This thunder-charged epic features Tumbling Reels and divine Multipliers that can summon stunning wins in both the base game and the Free Spins Round. Fueled by Pragmatic Play’s trademark visuals and animations, it’s a reel forged in the fires of Hephaestus and definitely worth a spin or two. Mount Olympus is the highest mountain in Greece, standing 2,917m (9,572ft) high in northern Greece, on the border of Thessaly and Macedonia. The hiking season here is relatively short, with the best time to climb Mount Olympus being between June and early October, when the trails are free of snow, and the mountain huts are open.
https://mustangcons.ca/jetx-review-an-exciting-casino-game-experience-for-kenyan-players/
CapCut is a great video editor for adding text overlays or animated subtitles to your videos. The app offers dozens of free fonts and style templates to create stylized text for your content. You can easily add subtitles using the auto-generated captions. I must have got this app early on, because I one, never paid a dime, and two, as far as I can see, I have all features (video effects, transitions etc) and I’ve never seen anything about subscribing or anything about cloud storage in the version of the app I have. If you’re looking for a free video editor with a wide range of editing tools and other features, go no further than KineMaster. One may begin a project in a variety of aspect ratios, from the theatrical 16:9 to the Instagram-perfect 1:1. It is among the free video editing apps for iPhone.
Expectador JUST LAUNCHED: CURLING STRAIGHTENER. Shop Now Expectador View cartCheckout No hace falta poner ese tag *Su-su-su-sugar rush* (Ayy) En esta página puedes consultar tus estadísticas dentro del juego, escribe tu Tag de jugador, puedes escribirlo con o sin almohadilla (#). Rizos que duran, por fin. Ahora en un exclusivo color Sugarplum. Espero les haya sido útil esta letra, recuerden que pueden dejar cualquier recomendación o petición de canción que quieran en los comentarios y yo les traere la pronunciación. No olviden votar si les gusto y compartir mi trabajo. ¡Gracias! 💜 JUST LAUNCHED: CURLING STRAIGHTENER. Shop Now Shop the Pro Brush Collection Sorry, this product is unavailable. Please choose a different combination. Sorry, this product is unavailable. Please choose a different combination.
http://www.panoramahotel.ro/resena-del-juego-balloon-de-smartsoft-en-casinos-online-para-jugadores-de-colombia/
La Liga de Quito ha confirmado que el show artístico comenzará a las 12:45, brindando a los hinchas un repertorio especial para la ocasión. Las votaciones para el Balón de Oro 2025 ya han concluido y el resultado está decidido. El ganador será revelado el 22 de septiembre en París. El jurado, compuesto por… Disney – Pixar cautivaron el corazón de miles de personas en todo el mundo con la cinta ‘Ralph el demoledor’, la cual hace un homenaje al los videojuegos de los años 80 y cuya historia gira entorno a un hombre de gran tamaño que se rehusa a continuar con su destino como el villano de videojuego en el que vive, pues está condenado a perder y a ser rechazado. Redes sociales: Este evento promete agregar emoción y color a la jornada. Donnarumma refuses to blame Serie A as Italy players join Premier League clubs
Your point of view caught my eye and was very interesting. Thanks. I have a question for you. https://accounts.binance.com/pt-PT/register-person?ref=KDN7HDOR
richelieu drouot
References:
http://smccd.edu/disclaimer/redirect.php?url=https://www.bookmark-fuel.win/official-site-5
el cortez casino
References:
https://lordfilmy2025.org/user/maultapsqb
oaks casino towers brisbane
References:
https://lovebookmark.date/story.php?title=best-real-money-online-casinos-australia-2025-updated-list
gsn casino games
References:
https://kinogo.luxe/user/alannakyef
monopoly slot machine
References:
https://bookmarkstore.download/story.php?title=hotel-crown-promenade-melbourne-australia
margaritaville casino
References:
http://www.uk-corp.co.uk/index.php?action=profile;area=forumprofile;u=1028024
river cree casino edmonton
References:
https://www.google.bt/url?q=https://urlscan.io/result/scan/
indiana live casino
References:
https://maps.google.com.sl/url?q=https://atavi.com/share/xkphbwz10veqo
Proces oceny i wyboru kasyn do współpracy jest niezwykle rygorystyczny. Bierzemy pod uwagę wiele czynników, takich jak: licencja i nadzór, różnorodność gier i dostawców, metody płatności, programy lojalnościowe i bonusy, obsługa klienta oraz bezpieczeństwo i uczciwa gra. Profesjonalizm. Doświadczenie. Niezawodność. Wiele interaktywnych gier dostępnych jest w wersjach demonstracyjnych, co pozwala na darmowe testowanie i nabieranie doświadczenia bez ryzyka. Planowana jest także dedykowana aplikacja mobilna na Android i iOS. Nasza decyzja pozostanie ostateczna i nie możemy dostarczyć żadnych dalszych dowodów na prośbę Juli, który koncentruje się na ekskluzywnych automatach do gier. Nie ma opłat za transakcje konsumenckie, które musisz wysłać. Graj w blackjacka za darmo na swoim telefonie z Androidem.
https://venom711.com/max-win-gates-of-olympus-1000-jak-zdobyc-maksymalna-wygrana/
Kredyty te są dostępne tylko dla podatników o skorygowanym dochodzie brutto poniżej określonych kwot, każdy może spróbować swoich sił w grze. Mieć grę, nie ponosząc przy tym żadnych kosztów. Age Of The Gods King Of Olympus Megaways: ekscytujące połączenie hazardu i latania. Gra w ten automat wideo i Age of the Gods – King of Olympus, według recenzji kasyna, odbywa się na 5 bębnach, które są podzielone na trzy poziome linie, z 25 ustalonymi liniami wygrywającymi. Automaty online na prawdziwe pieniądze merkur Kanadyjczycy lubią wydawać pieniądze na swoje ulubione formy rozrywki, że są one dość oryginalne. Wejdź do gry razem z nami i testuj wszystkie funkcje zupełnie za darmo. Eye of Horus slot za darmo dostępna jest na naszej stronie Polskie Sloty. Opracuj swoja indywidualną taktykę i rozbij bankw jednym z internetowych kasyn z Eye of Horus na prawdziwe pieniądze.
fantasy springs casino
References:
https://www.aupeopleweb.com.au/au/home.php?mod=space&uid=2439216
jackpot casino
References:
https://maps.google.mw/url?q=https://atavi.com/share/xkphffz1utggb
yo mtv raps
References:
https://www.ydaojia.com/home.php?mod=space&uid=890414
paddy power casino mobile
References:
https://blkbook.blactive.com/read-blog/47913_best-online-casinos-in-australia-2025.html
bangor casino
References:
http://47.96.178.171:3000/ricardo0569209
river rock casino
References:
https://b4india.in/read-blog/996_online-casino-vip-programs-best-australian-casino-bonuses.html
casino gatineau
References:
https://chinasplanet.com/read-blog/2964_best-online-casinos-australia-2025-top-10-aussie-casino-sites.html
online gaming sites
References:
https://vibe2gether.com/@rozellalanham
station casinos las vegas
References:
https://oapk.online/magnoliarashee
binions casino
References:
https://worldmusicc.com/melodeedeasey
So, I stumbled upon 777uah the other day. Seems interesting. Might give it a whirl. It might be your new favorite. Have fun with 777uah.
northern lights casino
References:
https://erdi.us/monted70692469
I don’t think the title of your article matches the content lol. Just kidding, mainly because I had some doubts after reading the article. https://www.binance.info/register?ref=IXBIAFVY
Bei der Anmeldung erhalten neue Spieler einen beeindruckenden Willkommensbonus von 400 % und können Einzahlungen über PayPal vornehmen. Zudem finden Sie hier über 1.000 Video-Slots von renommierten Anbietern wie Merkur und Gamomat, sodass Langeweile garantiert nicht aufkommt. Löwen Play verfügt über eine Lizenz der deutschen Glücksspielbehörde GGL, was für Sicherheit und Seriosität spricht. Das Online-Casino bietet über 1.600 Spielautomaten von renommierten Anbietern wie Merkur, Bally Wulff und Pragmatic Play an. Die Registrierung ist einfach gehalten, erfordert jedoch eine Verifizierung über den Drittanbieter Jumio, um Identität und Volljährigkeit sicherzustellen und so den Schutz vor Geldwäsche und Teilnahme Minderjähriger zu gewährleisten.
Mobile Casino-Apps bieten den Spielern eine größere Auswahl an Slots und die Möglichkeit, bequem online zu spielen, ohne physisch zur Spielothek reisen zu müssen. Wer nach Begriffen wie „casino online deutschland“ oder „casino deutschland online“ sucht, meint meistens genau diese legalen Online-Spielotheken mit deutscher Lizenz. Gratis Casino Spiele online spielen zu können bedeutet auch, dass Sie Strategien entwickeln und neue Titel unverbindlich ausprobieren können. Die beliebtesten Spieleanbieter in Deutschland sind Novoline, Merkur und Gamomat, die viele Casinospiele anbieten, die aus landbasierten Spielotheken bekannt sind. So können Sie schnell und https://online-spielhallen.de/beste-online-casinos-deutschland-top-10-nov-2025-3/ ohne Risiken einzugehen. Auf Casino.at erklären wir Ihnen, wo Sie am besten Lotto online spielen können und bei welchen Lotterien die besten Gewinnchancen bestehen. Für Roulette-Spieler aus Österreich haben wir eine Auswahl an hochwertigen Echtgeld Casinos zusammengestellt, in denen Sie online spielen können.
Verde casino 50 free spins wenn Sie die Lizenzinformationen auf der Website eines Anbieters nicht leicht finden können, wird ein kleiner Prozentsatz des Einsatzes dem Jackpot hinzugefügt. Richtige Spielenthusiasten finden an Demospielen meistens nur solange Gefallen, aber der Chat-Dienst sollte in der Lage sein. Im Jahr 2023 begann In Touch Games Limited seine Reise als Hersteller von physischen Spielautomaten und Jukebox, können Sie das Spiel in Ihrem eigenen Tempo spielen. Wir bewerten Casinos basierend auf unseren persönlichen Erfahrungen sowie Bewertungen bestehender Casinospieler, müssen Sie lediglich Ihr Global Poker-Konto per SMS verifizieren. Sie finden auch Symbole mit Spielkarten von 9 bis Assen, automaten spielen mit echtgeld da das Casino möchte. Es gibt keine Möglichkeit, staatliches casino online können das Spiel genießen. Discover-Debitkarten werden jedoch generell überall dort akzeptiert, Blackjack und American Roulette spielen.
Instantspiele sind noch ganz neu in Online Casinos und bei uns eine weitere, interessante Spielkategorie. Tisch- und Kartenspiele werden in Casinos einfach nie aus der Mode kommen. Das betrifft Slots und Tischspiele, wobei Live Spiele leider nicht gratis ausprobiert werden können. Wir sind sehr stolz darauf, dass wir eine offizielle Glücksspiellizenz von der Regierung aus Curaçao erhalten haben.
References:
https://online-spielhallen.de/cosmo-casino-erfahrungen-mitglied-von-casino-rewards/
Dank großzügigem Willkommensbonus und blitzschnellen Auszahlungen genießen Spieler eine rundum angenehme Erfahrung – egal ob am PC oder mobil. Instant Casino bietet eine moderne Plattform mit über 3.000 Spielen von den besten Entwicklern. Für diejenigen, die verlockende Boni und eine große Auswahl an Spielen suchen, bietet Instant Casino eine attraktive Alternative. Während Instant Casino zahlreiche Vorteile bietet, sollten potenzielle Spieler auch einige kritische Faktoren berücksichtigen, bevor sie sich auf der Plattform anmelden. Die Spieler können davon ausgehen, dass ihre Gelder umgehend auf ihren Casinokonten erscheinen, so dass sie sich ohne unnötige Verzögerungen direkt in ihre Spielsessions stürzen können. Dieses vielfältige Angebot bietet den Spielern nicht nur Flexibilität, sondern stellt auch sicher, dass sie ihre bevorzugten digitalen Währungen für Transaktionen verwenden können. Das Vorhandensein unabhängiger Prüfungen stärkt den Ruf von Instant Casino in der wettbewerbsintensiven Landschaft der Online-Glücksspiele weiter.
Mir wurde auf jeden Fall die eine Auszahlung von 300€ gutgeschrieben (habe auf mein Bankkonto geschaut). Der Support hat dann gesagt ich soll eine Email schreiben, als ich mein Postfach dann geöffnet habe war da eine Email mit ihre Auszahlung war erfolgreich. Ich habe direkt wieder 300€ zur Auszahlung gegeben und mit den 100€ die ich dann hatte hab ich schnell wieder Gewonnen. Ich habe spiele schon ein paar Wochen auf dem Casino.
References:
https://online-spielhallen.de/beste-paypal-casinos-2025-top-anbieter-einzahlen/
Gates of Olympus uses a Pay Anywhere system rather than traditional paylines—you’re just counting matching symbols across the entire 6×5 grid. Land 8 or more of the same symbol anywhere on screen and you’ve got a win. Simple concept, but it fundamentally changes how you watch the reels. Is this the freedom you’ve craved? Is this your nature cure? Have you come to grieve or to breathe, to resist or persist? What are you hoping for? Remode, die einzigartige Band, die die Musik von Depeche Mode in einem mitreißenden rockigen Stil interpretiert, begeistert Fans auf der ganzen Welt. Mit ihrer energiegeladenen Bühnenpräsenz und ihrer Leidenschaft für die Musik von Depeche Mode schaffen sie es, das Publikum in ihren Bann zu ziehen. Gates of Olympus is available in the Slot Day mobile app, and Pragmatic Play’s HTML5 engine ensures smooth performance. The 6×5 grid packs 30 symbol positions onto your screen – visually dense and cramped on phone displays. Distinct, colorful symbols maintain readability despite the packed layout. Touch controls respond well, with accessible spin and bet buttons. The pay-anywhere mechanic is simpler to track on mobile than traditional paylines. Tumble sequences with multipliers get busy on smaller screens. It’s playable and smooth, just tighter than desktop.
https://www.comprardetectordemetales.es/review-book-of-dead-von-playn-go-im-online-casino-fur-osterreichische-spieler/
Übrigens: Um die Age of the Gods und Marvel Slots online zu spielen, empfehlen wir das Casino Las Vegas, wo Du die Spiele wahlweise über die Playtech Download Software oder als Sofortspiel Version im Web Browser aufrufen kannst. This website is using a security service to protect itself from online attacks. The action you just performed triggered the security solution. There are several actions that could trigger this block including submitting a certain word or phrase, a SQL command or malformed data. In the Zeus slot machine, the biggest winnings are possible during bonus rounds. It is advisable to have the highest bet before there appear 3 or more symbols of Zeus with a lightning bolt in his hand. In general, the game provides the gambling fans with a high chance of receiving major prize payouts. Theoretical return percent is 95.97%.
Philip Seymour Hoffman spielt die Hauptrolle dieses düsteren Dramas, das die zerstörerische Natur der Spielsucht auf eindrucksvolle Weise darstellt. Der Film zeigt die dunkle Seite des Finanzwesens und die Versuchungen, die mit schnellem Reichtum einhergehen. Giovanni Ribisi spielt die Hauptrolle eines College-Abbrechers, der in einer zwielichtigen Brokerfirma arbeitet. Al Pacino spielt den Casino-Besitzer, der in einen aufwendigen Raubüberfall verwickelt wird. „Ocean’s Thirteen“ ist der Abschluss der „Ocean’s Eleven“-Trilogie und zeigt Danny Ocean und seine Crew bei ihrem Versuch, einen Casino-Besitzer zu überlisten, der einen ihrer Freunde betrogen hat. William H. Macy spielt die Hauptrolle eines Mannes, der das Glück anderer Spieler beeinflusst und von einem Casino als „Pechvogel“ eingesetzt wird. Der Film zeigt die Spannung und die Risiken des Kartenzählens und wie die Studenten versuchen, das System zu schlagen.
Obwohl man gemeinsam mit Rothstein das Gef�hl hat, um ein paar wichtige Lektionen des Lebens reicher geworden zu sein, bleibt die Frage nach dem Sinn. Casino zeigt eine Industrie unter Ratio�na�li�sie�rungs�zw�ngen, er zeigt, was sich unter den feinen Anz�gen und Smokings, die auch die Mafiosis tragen, verbirgt. An der Ober�fl�che ist der Mafiosi ein Rebell, irgendwie auch ein kleiner Robin Hood, und �berdies ein Fami�li�en�vater, der seinen Clan zusam�men�h�lt. Kaum eine zweite Insti�tu�tion zeigt die Schat�ten�seiten des Kapi�ta�lismus in �hnlicher Deut�lich�keit.
References:
https://online-spielhallen.de/monro-casino-test-erfahrungen-fur-deutsche-spieler/
En España, los juegos más populares incluyen tragaperras, ruletas y blackjack. Un repertorio diverso mejora la experiencia de usuario y previene el aburrimiento. “,i+=t.escape(n,n.get(“review”).text,”html”,null,!0),i+=” Las clásicas tragaperras en su versión online están disponibles en el Casino Online de Speedybet, donde encontrarás miles de slots online con temáticas emocionantes, características exclusivas y filtros de búsqueda que te ayudarán a encontrar fácilmente tu tragaperras favorita. ¡Además, muchas de nuestras slots cuentan con Jackpots o Botes Acumulados que pueden convertir una sesión de juego en una gran victoria! En España, los juegos más populares incluyen tragaperras, ruletas y blackjack. Un repertorio diverso mejora la experiencia de usuario y previene el aburrimiento.
http://www.lvbang-tech.com/?p=18256
A pesar del RTP bajo, Pirots 3 está catalogado como altamente volátil, por lo que no se deben esperar grandes ganancias con mucha frecuencia. Sin embargo, los más afortunados pueden obtener una ganancia máxima de 10.000 veces su apuesta. La ventaja de esta promoción es que podrás aprovecharla cada vez que realices un depósito, y esa es una gran diferencia con respecto al bono sin depósito y tiradas gratis, que solamente se puede reclamar una vez. Pirots 3 es ese tipo de juego de ELK Studios que saca lo mejor de este proveedor. La calidad visual es impactante y el diseño sale de lo convencional que hemos visto antes. Los protagonistas en esta trama son los pájaros que cobran vida en una experiencia de juego en el Lejano Oeste. Este juego de casino online te lleva a lo mejor de una película clásica de vaqueros.
Este slot tem uma RTP de 96,50% e alta volatilidade. Além disso, ela tem muitas semelhanças com o famoso jogo Sweet Bonanza, outro produto da Pragmatic Play. Portanto, se você já jogou este jogo antes, não terá muita dificuldade para se acostumar com o Gates of Olympus. The Observatório Journal is a quarterly journal, focusing on academic discussion and advanced interdisciplinary studies in the field of Communication, Journalism and Education. The magazine is born internationalized, having publishers in Brazil, Cape Verde, Mozambique and Portugal. It receives in continuous flow, texts in Portuguese, Spanish, English and French for the sections articles, thematic dossier, essays, interview, review and free themes. (ISSN nº 2447-4266) Atendendo estes pontos, para quem joga com o bónus de boas-vindas, a nossa sugestão é que o faça nas slots Gates of Olympus (Original) ou Gates of Hades. Isto porque o rollover exige consistência. A volatilidade das versões 1000 e Super Scatter pode queimar o saldo rápido demais, mesmo com bónus.
https://silkdelta.com/jogo-do-tigre-ganhar-dinheiro-dicas-para-lucrar-mais/
A 55BB chega para se consolidar entre as principais casas de apostas online do Brasil, unindo inovação, segurança e variedade em jogos que agradam a todos os perfis de apostadores. Com uma plataforma moderna, interface intuitiva e suporte ágil em português, a 55BB promete elevar a experiência de quem busca emoção e ganhos reais. As transações via Pix são processadas em instantes, os bônus são atrativos e as opções incluem desde esportes ao vivo até slots envolventes, formando um ambiente completo de diversão e lucro. FRIDAY NIGHT JACKPOT RACES Every Friday, 8pm – 10pm. T’s & C’s Apply Bem-vindos a esta análise da Gates of Olympus 1000, onde poderá conhecer com grande detalhe as principais características, a temática e a mecânica de jogo desta que é uma das slot machines da moda neste momento. Se está curioso com esta nova criação da Pragmatic Play, venha daí e perceba se este é o jogo ideal para si!
best online game sites
References:
https://www.aupeopleweb.com.au/au/home.php?mod=space&uid=2438423
casinos en bogota
References:
https://gpsites.win/story.php?title=winstar-world-casino-hotel-relax-stay-and-play
vegas slots online
References:
https://scientific-programs.science/wiki/Welcome_Package_345_Bonus_200_FS
genting casino southport
References:
http://xhdyz.cn/home.php?mod=space&uid=364600
terribles casino las vegas
References:
https://elearnportal.science/wiki/Privacy_Policy
margaritaville casino
References:
https://www.google.com.pe/url?q=https://kanban.xsitepool.tu-freiberg.de/PAbYLQx0QSKHTISdtWxNQg/
prairie knights casino
References:
http://www.supergame.one/home.php?mod=space&uid=1870266
Thanks for sharing. I read many of your blog posts, cool, your blog is very good.
Do kolorowania i naklejania Granie po darmowe automaty online wydaje się być ustawowe jak i również nie jest traktowane zbyt hazard. Oznacza to, iż miłośnicy slotów potrafią bez jakichkolwiek bądź obaw skorzystać z naszego folderu gier, nie martwiąc się o owo, hdy naruszają obowiązujące w polsce ustawa. Wbrew, że nie możesz odgrywać w konkretne uciechy wraz z jackpotem internetowego za darmo, doradzamy dowiedzieć się parę recenzji ekspertów na temat tych gier, żeby dowiedzieć się więcej na temat nagłówku. Zamierzasz także zajrzeć wynocha fanów oraz ujrzeć, co inni myślą o pracach nad produktem pochodzące z jackpotem. Vinci spin casino 50 free spins platforma nie jest GamStop-obstawiaj tyle, który jest we Włoszech. Z Casino Arcade Ireland masz pełną kontrolę nad automatami zręcznościowymi, vinci spin casino 50 free spins kupi bilet w Twoim imieniu i wyśle Ci zeskanowaną kopię biletu.
https://www.hoaxbuster.com/redacteur/anobquiten1971
Nasza platforma – to miejsce, gdzie pasja do hazardu spotyka się z jakością, uczciwością i profesjonalnym wsparciem. Dzięki ogromnemu wyborowi gier, bezbłędnej technologii i pełnemu wsparciu w języku polskim, oferujemy środowisko stworzone z myślą o graczach, którzy oczekują więcej. Vulkan Vegas wyróżnia się na tle innych kasyn online, oferując również zakłady sportowe. Dla miłośników sportu, platforma zapewnia szeroki wybór dyscyplin, w tym piłkę nożną, koszykówkę, tenis, hokej na lodzie, a także e-sporty. Dzięki temu, gracze mogą nie tylko korzystać z tradycyjnych gier kasynowych, ale również obstawiać wyniki swoich ulubionych wydarzeń sportowych. Całe zadanie sprowadza się do kliknięcia w odpowiednią ikonę. Wtedy darmowa gra hot spot zostanie automatycznie wczytana i uruchomi się na Twoim urządzeniu, dzięki czemu będziesz mógł zagrać w Gates of Olympus za darmo na naszej stronie i poznać tę wspaniałą grę od strony praktycznej. A to na pewno Ci się przyda, gdy podejmiesz decyzję o spróbowaniu swoich sił w graniu w ten tytuł w swoim ulubionym kasynie internetowym.
Thanks for sharing. I read many of your blog posts, cool, your blog is very good.
I don’t think the title of your article matches the content lol. Just kidding, mainly because I had some doubts after reading the article.
The very crux of your writing while appearing reasonable at first, did not really work perfectly with me after some time. Somewhere within the sentences you managed to make me a believer but just for a very short while. I still have a problem with your jumps in assumptions and you would do nicely to fill in those gaps. If you actually can accomplish that, I would surely be impressed.
Pesobet, man, it’s where I go to chill and try my luck. Easy peasy to sign up and they got a decent selection of games. Definitely worth checking out if you’re looking for a new spot. Check it out here: pesobet
Jeder neue Spieler, der unserer Registrierungsanleitung oben folgt Karamba Übersichtsartikel Sie können zwischen Sport- und Online-Casino-Willkommensbonus wählen. Dies ist auf lokale Gesetze oder bestimmte behördliche Beschränkungen für Online-Glücksspiele zurückzuführen. Glücklicherweise sind die Solospiele nicht die einzige Möglichkeit, Tisch- und Kartenspiele bei zu genießen Karamba. Selbst diejenigen, die mit Sportwetten noch nicht vertraut sind, werden keine Probleme haben, es herauszufinden. Im Seitenmenü stehen über 30 Spiele zur Verfügung, während sich die wichtigsten Ereignisse vor dem Spiel und Live-Wetten in der Mitte der Seite befinden. Jeder Spieler kann die Slotspiele ohne Geld oder Bonusguthaben eröffnen.
Von Spielautomaten und Live-Dealer-Spielen bis hin zu Spielen mit sofortigem Gewinn werden alle von Top-Softwareanbietern unterstützt, darunter unter anderem NetEnt, Play’n GO und Microgaming. Unter den umfangreichen Optionen finden Sie ein Spiel, das Ihren Vorlieben entspricht. Jeder Spieler, unabhängig von seinem Professionalitätsgrad, sollte erwägen, dieses Casino auszuprobieren, da es ein nahtloses und elektrisierendes Erlebnis bietet. Der Willkommensbonus wird automatisch nach Ihrer ersten Einzahlung gutgeschrieben. Sie bietet Zugriff auf eine große Auswahl an Spielen und Funktionen und sorgt für ein reibungsloses und angenehmes Spielerlebnis.
Karamba bietet eine Vielzahl von Zahlungsmethoden an, darunter Kredit-/Debitkarten, E-Wallets und Banküberweisungen. In Zusammenarbeit mit Aspire Global International LTD bietet Karamba ein unvergleichliches Spielerlebnis. Dieses Verschlüsselungsniveau entspricht den Standards globaler Finanzinstitute und bietet allen Nutzern ein Höchstmaß an Sicherheit. Egal, ob du über deinen Desktop oder ein mobiles Gerät auf die Plattform zugreifst – Karamba sorgt für ein nahtloses, sicheres und aufregendes Spielerlebnis. Seit 2005 ist Karamba ein vertrauenswürdiger Name in der Online-Gaming-Branche und bietet erstklassige Casino-Spiele sowie Sportwetten. Durch die Änderungen der Deutschen Casino Lizenz sind momentan nur Automatenspiele und Slots erlaubt.
References:
https://online-spielhallen.de/beste-online-casino-spiele-2025-top-tipps/
Insgesamt bietet Sol Casino ein umfassendes Angebot an Tischspielen, das für alle Arten von Spieler geeignet ist. Das Spiel ist immer mit einem Risiko verbunden und es gehört ausschließlich unseren Lesern, verantwortungsbewusst zu spielen. Wenn Sie auf der Website um echtes Geld spielen möchten, müssen Sie Einzahlungen vornehmen können. Die Website von Sol Casino hat eine mobile Version für diejenigen, die unterwegs spielen möchten.
Die Mindesteinzahlung zur Aktivierung des Angebots beträgt 40€. Jede Woche haben Sie die Möglichkeit, einen 50 %-Bonus bis zu 400 € zu erhalten, und das ist, wie Sie sehen, eine tolle Bereicherung für Ihr Guthaben. Wenn Sie zu den Spielern gehören, die Bargeldboni bevorzugen, wird Sie Sol Casino ebenfalls nicht enttäuschen. Alle Freispiele werden dem Dragon’s Gold 100-Slot gutgeschrieben und Gewinne daraus können nach mindestens 40-maligem Einsatz ausgezahlt werden. Der Bonusbonus beträgt 50 % auf die Einzahlung, maximal bis zu 300 €.
Sobald Sie dies getan haben, erhalten Sie eine Bestätigungs-E-Mail an die von Ihnen angegebene E-Mail-Adresse. Die Website bietet auch eine Vielzahl von Zahlungsmethoden an, darunter verschiedene E-Wallets und Kryptowährungen wie Bitcoin. Der Zugang zu den Spielen ist über PC oder mobile Geräte möglich, die Spielbibliothek ist HTML5-basiert und bietet eine reibungslose Erfahrung auf mobilen Geräten. Wir bieten Ihnen täglich eine Vielzahl von Spielen an, darunter Slots, Tischspiele, Live-Casino-Spiele und viele mehr. Mit unserem VIP-Programm erhalten Sie exklusive Boni, Cashback-Angebote und andere attraktive Vorteile.
References:
https://online-spielhallen.de/drip-casino-cashback-eine-umfassende-analyse/
Mit einer Mindesteinzahlung von 20 € und maximalen wöchentlichen Limits von 5.000 € können die Spieler sicher sein, dass ihre Gelder sicher und leicht zugänglich sind, was ein unterbrechungsfreies Spielerlebnis gewährleistet. Mit einem maximalen Einsatz von nur 4 € können Sie die Freiheit genießen, ohne Einschränkungen zu spielen. Wolfy Casino ist eine moderne Online-Crypto- und Fiat-Casino-Plattform mit einem Fokus auf “wettfreie” Boni, umfangreicher Spielauswahl und deutschsprachigen Angeboten für europäische Märkte.
Bis zu 50% Casino Bonus kannst du dir sichern, wenn du die zweite Einzahlung tätigst. Neukunden können sich bis zu 1.000 Euro Bonusgeld sichern. Der Wolfy Casino Willkommensbonus kann sich sehen lassen. Das sind die typischen Klassiker im Bereich der Tischspiele. Es gibt viele Spiele, Live Casino Spiele, einen guten Bonus und einen guten Kundensupport.
References:
https://online-spielhallen.de/playfina-casino-promo-code-ihr-schlussel-zu-exklusiven-vorteilen/
Im regulären Spiel beträgt der größte Jackpot 10,000 Münzen und wird gewonnen, die alle mit hochwertigen Grafiken und Soundeffekten ausgestattet sind. Casinos, die folgenden Tipps zu beachten. Die Casinos bieten Boni und Promos an, kostenlos spielen ps sugar rush freispiele ohne einzahlung wenn Sie auf einer Casino-Website Bankgeschäfte tätigen. Das Büro Ricklingen bleibt vom 07.07.25 bis 08.07.25 und am Montag, 21.07.25 ab 15 Uhr geschlossen. Bitte wenden Sie sich an unsere Filiale in Hemmingen. Es handelt sich bei diesem Angebot um unbehandelte und GVO freie Samen, die gem. EU Saatgutverordnung nur für den Verkauf an Hobbygärtner bestimmt sind. COPYRIGHT © 2015 – 2025. Alle Rechte vorbehalten für Pragmatic Play, eine Investition von Veridian (Gibraltar) Limited. Jeglicher auf dieser Website enthaltene oder referenzierte Inhalt ist durch internationale Urheberrechtsgesetze geschützt.
https://www.hoaxbuster.com/redacteur/inculderske1973
PRODUKTE UND DIENSTLEISTUNGEN MENÜ SCHLIESSEN Durch den Einsatz neuester Technologien, das Fachwissen und die Erfahrung der besten Spezialisten und die hervorragende Kenntnis der Branche sind wir in der Lage, auch die anspruchsvollsten Erwartungen zu erfüllen und ein umfassendes, raffiniertes und einzigartiges Produkt zu liefern. Whenever a winning symbol explodes, its spot is marked on the grid. If another blasts upon that spot for a second time, a multiplier is added, starting from x2 and doubling up to x1,024 with each instance. The resulting multiplier is added to all winning combinations that are formed on top of it. Sie sind angemeldet.Abmelden Nutze die Aktion und werde jetzt Teil unseres Premium-Services! Beispielsweise ein Hufeisen oder auch ein vierblättriges Kleeblatt. Auch ist ein Wild vorhanden, sodass im Notfall auch mal Reihen ersetzt werden können, selbst wenn nicht alle Symbole vorhanden sind. Und das Koboldsymbol dürfte auch ein gerne gesehener Gast auf den Walzen werden, denn dadurch gibt es einen zusätzlichen Gewinn.
Pour ceux qui recherchent une expérience encore plus innovante, Reactoonz 2 de Play’n GO pousse le concept de cascade à un niveau supérieur. Ce jeu introduit un système complexe de compteurs d’énergie qui se remplissent progressivement pour déclencher diverses fonctionnalités spéciales. Bien que plus complexe à maîtriser que Gates Of Olympus, Reactoonz 2 offre une profondeur de gameplay qui récompense les joueurs patients. Son univers extraterrestre décalé constitue également un changement radical par rapport au thème mythologique grec. Avant de l’activation de gagner jusqu’à 5 000 fois votre mise! Jouer dans gates of olympus, est disponible sur la machine à. Faites l’expérience d’un jeu a tissée dans gates of olympus confirme sa volatilité intrinsèque du royaume de gameplay et à une fonctionnalité.
http://forum.dmec.vn/index.php?members/gacaturo1985.152609/
Le grand Vortex est la cible de toutes les convoitises au cours de la nouvelle campagne A l’instar du tennis, une balle qui heurte le filet puis effectue deux rebonds dans le carré de service adverse est considéré comme un « let » et permet donc de nouveau deux services. Machine à tatouer sans fil Ambition – Soldier Max FAITES-NOUS UN PETIT COUCOU (ou pour toute question demande de partenariat) admin@le-vortex Nos abonnés qui ne souhaitent pas en être informés peuvent choisir de masquer ces promos à tout moment. Bref j’en ai commander un 3 éme car j’utilise cette machine pour mes entraînements, avec 2 machines j’arrivais a passer 3 a 4 h de vol intense sans rentrer a la maison a cause d’une panne, maintenant je pense tenir une journée ( car mètre en panne 3 vortex en une journée faut vraiment le chercher )
Gates of Olympus Xmas 1000 es una tragaperras de alta volatilidad, lo que significa que las ganancias pueden ser grandes. Además, la posibilidad de ganar hasta 15.000 veces tu apuesta hace que cada giro sea una oportunidad emocionante. Gates of Olympus es una emocionante tragamonedas de casino en línea donde los jugadores se sumergen en el mundo mitológico de los dioses griegos antiguos. El juego ofrece 6 carretes, multiplicadores y ganancias en cascada, creando una experiencia de juego dinámica. Los símbolos de los dioses y artefactos legendarios añaden a la atmósfera, y la función de giros gratis con multiplicadores crecientes brinda la oportunidad de obtener grandes premios. You can email the site owner to let them know you were blocked. Please include what you were doing when this page came up and the Cloudflare Ray ID found at the bottom of this page.
https://dedenlithern1977.bearsfanteamshop.com/pin-up-apuestas-deportivas
ITT Canarias es distribuidor oficial de maquinaria para la construcción y la industria. Damos servicio de primeras marcas como: Case CE, Bobcat, MB Crusher, Hamm, Putzmeister, Arden, Kleeman, Jenz, Tana, Lindner, Edge, Franzoi Sigue estos pasos para saber cu00f3mo jugar a Gates of Olympus y empieza a disfrutar el juego con dinero real. Una vez te encuentres registrado en un casino online que te guste, podru00e1s jugar a Gates of Olympus gratis o con dinero real, haciendo depu00f3sitos ru00e1pidos y muy seguros al instante. Gates of Olympus está cargado de funciones que pueden desatar premios monumentales: Fitur multiplier dalam slot demo pg soft wild bounty dimulai dengan pengali x1 di setiap putaran utama. Jika terdapat satu atau lebih simbol kemenangan selama putaran, setelah pembayaran dilakukan dan simbol-simbol baru jatuh, nilai pengali akan bertambah dua kali lipat. Pengali kemenangan dapat terus meningkat hingga mencapai maksimal x1.024, memberikan kesempatan untuk memenangkan hadiah yang lebih besar dalam permainan.
La versión gratuita del juego funciona igual que Gates of Olympus con dinero real en los casinos online. La única diferencia es que no puedes perder ni ganar dinero real. Gates of Olympus 1000 slot se caracteriza por su temática basada en la mitología griega, y su gran premio mayor que puede ascender a 15,000x la apuesta. La mecánica de Tumble en este juego hace que los símbolos ganadores se vayan de la pantalla, dejando espacio para nuevos símbolos y más oportunidades de ganar. Así que ya sabes: si estás buscando una slot que combine acción, estética divina y premios que pueden ser mitológicos, no busques más. Gates of Olympus te espera… y Zeus también. Sí, en WebApuestas puedes probar Gates of Olympus slot demo gratis online sin descargas ni registros. Es la mejor forma de practicar antes de apostar con dinero real.
https://luwak168.com/ranking-de-jugadores-en-balloon-juego-dinero-quienes-lideran-en-guatemala/
La primera entrega de la saga es la slot Gates of Olympus sorprendió a todos con su volatilidad alta y su sistema de caída de símbolos que permite acumulaciones de ganancias en un solo giro. Con 20 líneas de pago y un retorno al jugador (RTP) del 94.50%, esta slot se convirtió rápidamente en uno de los favoritos de los jugadores. Una plataforma creada para mostrar el trabajo que llevamos a cabo para hacer realidad una industria del juego online más transparente y segura. Si bien es cierto que los únicos casinos convencionales son propiedad de nativos americanos y, sin embargo. Sin embargo, juegos tragamonedas gratis para ipad Steve Spielberg es una leyenda viviente y entregó una nueva versión de la icónica West Side Story. Casino profesional o de disparos en vivo, tendrás que aprender a elegir el mejor juego de casino en línea para que sea tu favorito. Disfrutamos girando los carretes de esta tragamonedas, tragaperras online gates of olympus por cuestiones de derechos televisivos.
Besides the FAQ section, players can also contact the Royal Reels Casino customer support team directly via live chat, email, or phone, providing prompt assistance and solutions to any issues that may arise during their gaming experience. Royal Reels Casino entices players with a range of enticing bonuses and promotions, including a generous welcome bonus for new players and an exclusive VIP program designed to reward high rollers for their loyalty and gameplay. Royal Reels Casino excels in its focus on pokie games, offering an immersive and engaging experience with titles from top providers like Spade Gaming and BetSoft, ensuring that players can enjoy a variety of themes and gameplay styles. With its sleek interface and user-friendly navigation, Royal Reels Casino provides a seamless online platform for players to enjoy a wide range of casino games from the comfort of their own homes. Royal Reels Casino has emerged as a prominent player in the online gaming industry, offering a diverse and engaging digital casino experience to players. With over 2000 games to choose from, a focus on pokie games, and live dealer options, this casino is quickly making a name for itself in the https://blackcoin.co/discover-the-thrilling-world-of-online-gambling/ market.
Royal Reels Casino encourages frequent logins where dynamic bonuses are often linked to activity milestones. Down the line, actively participating in seasonal promotions and realizing adventure in daily offerings can amplify the winning margin through extended play sessions. Explore the FAQ section for instant solutions, and reach out to our live support should real-time help be needed. For a more immersive experience, tap into Royal Reels’ community spaces where discussions on strategies and game tips happen.
By combining entertainment with stringent security measures, Royal Reels Casino stands out as a trustworthy destination for online gaming enthusiasts. Players at Royal Reels Casino can enjoy a seamless gaming experience knowing that their personal and financial information is protected by top-notch encryption technology. Players can easily navigate through the carefully curated categories present in the FAQ section, such as payment methods, bonuses, technical issues, and more.
Traditional slot fans can enjoy Cash Crazy Slots, which captures the essence of classic casino gaming through familiar symbols like sevens, cherries, and bars. This strategy builds community engagement while providing additional value to dedicated players. Cashman Casino leverages social media platforms to extend the free play experience beyond the game itself. This system creates a sense of progression and achievement that keeps players engaged long-term. The developer has not yet indicated which accessibility features this app supports. Get our NEW games in our latest update!
The platform also saves your game preferences and betting patterns, making each session feel personalized. Cashman Casino regularly posts free coin links on Facebook, Twitter, and Instagram. The reward structure includes multiple collection opportunities throughout the day.
Account management features allow players to adjust notification settings, manage friend connections, and control privacy preferences. Since the platform operates with virtual currency only, there are no financial transactions to secure, but personal information and gameplay data receive proper protection. The game library spans multiple providers including Pragmatic Play, Microgaming, and Belatra Games, ensuring variety in gameplay styles and themes. These promotions are only accessible to registered users, making your account valuable beyond just game access. Every time you log in, you’re rewarded with free coins, and consecutive logins increase your bonus streak.
References:
https://blackcoin.co/best-live-dealer-online-casinos-in-australia/
Head straight for the casino, or wait for that lucky feeling while you enjoy one of the other recreational opportunities, such as a health club and an indoor pool. This casino hotel is 2 mi (3.2 km) from Constitution Dock and 2.3 mi (3.7 km) from Hobart Cruise Terminal. Studio Apartment – 5 Minutes to Hobart CBD – Free Parking – Free WIFI Cosy renovated 2 bed villa in superb location
It’s simple to treat yourself to nine wonderful eateries and hotel accommodations. Whether you decide to stay at the Motor Inn or in the Tower Premier Suite, you’ll find that your hotel accommodations at Wrest Point are some of the best around. Located in Sandy Bay, this luxury hotel is within 2 mi (3 km) of Salamanca Place, Salamanca Market, and Constitution Dock. For those seeking proximity to the water, the Water Edge rooms provide serene river views, while the Motor Inn rooms offer comfortable and affordable options with easy access to the resort’s facilities. Wrest Point’s location, stunning views and spaces that include foyers, restaurants, bars, and large and small private rooms ensure every occasion will impress.
References:
https://blackcoin.co/treasury-casino-a-comprehensive-overview/
However, it’s important to note that according to recent player feedback, iOS users-specifically those on Safari-have reported severe instability. All insights below are based on verified research and real-world Aussie player feedback, so you can trust you’re not just reading another generic overseas rundown. Lost count of the times I’ve chucked a tantrum because some casinos don’t get Aussie payment methods.
By adding a deposit bonus, you will have a higher chance of winning bigger cash. As Curaçao’s government licenses it, it is safe to gamble online while ensuring it employs robust security measures—the data encryption of all transactions within the platform. Robust security measures ensure that player safety is a priority of the Casino. Check the rules regarding game restrictions or limited time to meet wagering requirements. You can log into your account or contact support to check how much of the requirement you have finished.
References:
https://blackcoin.co/get-up-to-4000-bonus-ultimate-aussie-gaming-experience/
There are so many operator sites available on the internet, that it becomes really difficult for those who don’t have much experience to choose the right site to play on. This kind of entertainment was once reserved for the elite socialites who could afford to attend land-based casinos, but no more! If you play at one of the sites featured on this page, you can be certain that it is fair. While Australians are not allowed to run a casino themselves, it is perfectly legal for them to gamble online.
The reload bonus is suited for many kinds of players, but holds specific value for frequent gamblers. The welcome bonus is best for first-time players who are looking to get a boost to their bankroll. Now we’re going to walk you through the most common bonuses, how they can help pad your bankroll and the best casino to claim each of them at. Above we covered the best bonuses based on player type.
References:
https://blackcoin.co/true-fortune-casino-review/
When selecting an online casino, it’s essential to consider the types of promotions available. This helps us make sure every platform we show is one of the https://blackcoin.co/lukki-casino-login-access-your-gaming-adventure/ sites. Wondering where your next favourite place to gamble online for real money might be? Trustworthy casinos are regularly audited by independent third parties to confirm the fairness of their games.
E-wallets like Skrill, Neteller, and EcoPayz are popular at some Australian casino sites. One of the best things about using international casinos is the variety of payment options. Some games even add jackpots or a small cashback if you don’t get lucky. Nothing beats playing with a real dealer, even if you’re still on the sofa. Jacks Or Better and Deuces Wild are classics, but some sites offer 20+ different versions.
Yes, our mobile site works on all smartphones and tablets through your browser. Minimum deposits are $10 for cards and e-wallets, $20 for cryptocurrencies, and $50 for bank transfers. E-wallet withdrawals process within 2-12 hours, cryptocurrencies within 1 hour, and card withdrawals take 3-5 business days after approval. Most queries get resolved within minutes on live chat, though complex payment investigations might take up to 24 hours — we’ll keep you updated throughout.
When you need help, Zoome Casino support is available 24/7. Once set, this cannot be reversed until the agreed time has passed. Once activated, you’ll need to enter a time-sensitive code alongside your regular login credentials. Its licence requires compliance with anti-fraud, fair gaming, and responsible gambling standards.
The minimum deposit is €20 across all accepted payment methods including cards and e-wallets. No, titles like Zoome in Vegas and Book of Zoome are developed exclusively for this platform and unavailable elsewhere. Yes, the casino operates under a valid Curaçao Gaming Authority licence with advanced SSL encryption protecting all transactions. With over 5,000 titles on offer, you’re in for a cracking good time here.” AskGamblers, amazinglou, ~7 months ago — “Been playing at Zoome Casino for over two years now and never had any dramas.
References:
https://blackcoin.co/country-club-casino-ultimate-guide/
If you believe you should have access, please contact us: This site is protected by reCAPTCHA and the Google Privacy Policy and Terms of Service apply. If you believe you should have access, please contact us: Online pokies are extremely widely played all around the globe, so be sure to read the terms and conditions carefully. Finally, premium play casino Mo Donegal and Giant Game. Contact Us Contact Us George is a skilled copywriter with a focus on the online casino industry. His expertise lies in providing in-depth casino and slot reviews, consistently delivering objective and well-researched content. Known for his keen eye in identifying top casino bonuses, George offers valuable insights for players navigating the online gaming world. His writing is informed by comprehensive research and a deep understanding of the latest trends in online casinos, making his reviews and recommendations both reliable and current.
https://matauang88.com/neon-fruit-machine-vibes-super-joker-megaways-slot-review/
The range of bets on the site we tested ran from a minimum bet per spin of $ £ €0.20 up to a maximum of $ £ €100 per spin. Gates of Olympus Super Scatter is set up in the clouds, in Zeus’s personal temple, so of course he appears in person. He stands front and center on the grid, while the backdrop is a stormy sky, and Zeus’s palatial home. With Lottoland, there’s no waiting, no queues, and no downloads. Just open your browser and play slots online instantly. All of our online slots offerings are accessible with just a few clicks, whether you’re using a mobile, tablet, or desktop device. COPYRIGHT © 2015 – 2025. All rights reserved to Pragmatic Play, a Veridian (Gibraltar) Limited investment. Any and all content included on this website or incorporated by reference is protected by international copyright laws.
0(533) 484 04 63 Bigger Bass Bonanza tarafından Reel Kingdom Big Bass Bonanza yuvası Megaways motoruyla buluşuyor Big Bass Bonanza MegawaysPragmatic Play tarafından çevrimiçi slot. Daha önceki slotlardan çok farklıdır çünkü Megaways, Tumble özelliği, Para sembolleri, Ücretsiz Döndürme ve Balıkçı sembolüne sahiptir. Önceki slotların en iyi unsurlarını alır ve tamamen yeni bir deneyim için bazı yeni unsurlar ekler. Big Bass Bonanza Hold and Spinner tarafından Reel Kingdom Big Bass Bonanza Megaways tarafından Reel Kingdom Big Bass Bonanza 3 Reeler tarafından Reel Kingdom 0(533) 484 04 63 Hemen Ara: Frp Zar Online Frp Zar Online Bigger Bass Bonanza tarafından Reel Kingdom Hemen Ara: Big Bass Bonanza Megaways yuvası Reel Kingdom ve ‘un ortaklığında bir başka güzel bölümdür. Pragmatic Play. Bu slot, Big Bass Bonanza slot serisinin evrimindeki bir sonraki adımdır.
https://theafricavoice.com/profile/saloslahi1977
Big Bass Bonanza 3 Reeler tarafından Reel Kingdom Pusulabet iletişim yöntemleri bence çok önemli; genelde Siteler incelenirken herkes Güven şikayet gibi konuları daha çok merak eder. Ama benim sana tavsiyem bu konuları merak Big Bass Bonanza 3 Reeler tarafından Reel Kingdom Rainbow Riches Nasıl Oynanır Ve Hilesi 0(533) 484 04 63 Big Bass Bonanza 3 Reeler tarafından Reel Kingdom Bigger Bass Bonanza tarafından Reel Kingdom Big Bass Bonanza yuvası Megaways motoruyla buluşuyor Big Bass Bonanza MegawaysPragmatic Play tarafından çevrimiçi slot. Daha önceki slotlardan çok farklıdır çünkü Megaways, Tumble özelliği, Para sembolleri, Ücretsiz Döndürme ve Balıkçı sembolüne sahiptir. Önceki slotların en iyi unsurlarını alır ve tamamen yeni bir deneyim için bazı yeni unsurlar ekler.
Your article helped me a lot, is there any more related content? Thanks! https://www.binance.info/register?ref=IXBIAFVY
online casinos that accept paypal
References:
https://dev.yayprint.com/online-casinos-that-accept-paypal-2/
online american casinos that accept paypal
References:
https://workfind.in/profile/eldenbejah5097
paypal casinos online that accept
References:
https://mapnova.com.co/employer/online-casinos-that-accept-paypal/
casino online paypal
References:
https://glimpsonworld.com/employer/477/in-depth-reviews-bonuses
online casino with paypal
References:
https://hitechjobs.me/companies/payid-deposit-casino-australia-%ef%b8%8f-real-play-fast-payouts/
Online machine big bass bonanza this land-based operator offers excellent fun and entertainment and responsible gaming in Dunedin to its players, though. Big bass bonanza – The casino game with bonus prizes. ④ Complete Google sign-in (if you skipped step 2) to install Big Bass Bonanza. We can confirm it’s possible to play Big Bass Bonanza online from your smart device with the same quality and graphics as experienced on the desktop version. Thoroughly tested and reliable demo. All embeds are manually verified and maintained. Ideal for generating quality casino traffic. Key features: Once you install Big Bass Bonanza by setting up the casino app, you are just moments away from playing. To launch Big Bass Bonanza, simply find the casino app icon on your phone’s home screen or in your app library and tap to open it.
https://forum.herozerogame.com/index.php?/user/136547-amandadixon/
Playing the Big Bass Bonanza slot UK online is easy and accessible. Simply follow these steps: Many UK casinos offer welcome bonuses and free spins as well as Drops & Wins tournaments, which will give you a chance to play this slot – and sometimes those free spins even apply directly to Big Bass Bonanza! Just make sure to check the T&Cs, because not all offers will be for specific slots. The Bigger Bass Bonanza maximum win is 4,000x your total stake. At minimum bet of 0.120 per spin is 480 in cash, and at the maximum bet of 240 is 960,000. Big Bass Bonanza keeps it simple – fishing rods, lures, and the titular bass flopping across a static underwater backdrop. The layout’s as familiar as your uncle’s fishing stories, with water bubbles separating the reels and a float symbol paying 200x for five of a kind. The calm vibe and clean visuals probably explain why it’s a mainstay at online casinos.
Το φρουτάκι Gates of Olympus προσφέρει συναρπαστική εμπειρία παιχνιδιού με υψηλό RTP και πολλά μπόνους χαρακτηριστικά. Δοκιμάστε το δωρεάν στη δοκιμαστική λειτουργία για να εξερευνήσετε τις δυνατότητες του παιχνιδιού και προκαλέστε την τύχη σας με στρατηγικές για μεγάλες νίκες. Η μοναδική θεματολογία του και οι υψηλές αποδόσεις το καθιστούν μία εξαιρετική επιλογή για κάθε λάτρη των κουλοχέρηδων. Οχι, το παιχνίδι του Gates of Olympus δεν έχει κάποια λειτουργία τζάκποτ, εσωτερικό ή προοδευτικό. Αυτό σημαίνει, ότι το μεγαλύτερο ποσό, που μπορείτε να κερδίσετε, είναι ο μέγιστος πολλαπλασιαστής, που προσφέρει το παιχνίδι. Η μέγιστη νίκη ορίζεται στο 5.000x.
https://maugiaogovap.com/2576/%ce%b1%ce%bd%ce%b1%cf%83%ce%ba%cf%8c%cf%80%ce%b7%cf%83%ce%b7-%cf%84%ce%bf%cf%85-gates-of-olympus-%cf%84%ce%bf-%cf%86%ce%b1%ce%b9%ce%bd%cf%8c%ce%bc%ce%b5%ce%bd%ce%bf-%cf%84%cf%89%ce%bd-online/
Το WinBay καζίνο έχει καθιερωθεί ως μία από τις κορυφαίες επιλογές για τους Έλληνες παίκτες που αναζητούν μια ολοκληρωμένη διαδικτυακή εμπειρία τυχερών παιχνιδιών. Από το 2022 που έκανε την εμφάνισή του στην ελληνική αγορά, το WinBay online casino έχει κερδίσει την εμπιστοσύνη χιλιάδων παικτών χάρη στην πλούσια συλλογή παιχνιδιών, τις γενναιόδωρες προσφορές και την αξιόπιστη εξυπηρέτηση. Book of Ra Temple of Gold Εάν δείτε κάποιο παιχνίδι στο οποίο θέλετε να ποντάρετε πραγματικά χρήματα, τότε ρίξτε μια ματιά στα καζίνο κάτω από το παράθυρο του παιχνιδιού. Καθένα από αυτά τα καζίνο σας δίνει τη δυνατότητα να παίξετε το παιχνίδι με πραγματικά χρήματα. Απλά πρέπει να κάνετε εγγραφή και (πιθανότατα) μια κατάθεση.
We use cookies to help you navigate efficiently and perform certain functions. You will find detailed information about all cookies under each consent category below. De primaire spraak ben Nederlands, maar de webpagina bestaan ook beschikbaar afwisselend verscheidene andere haken. Offlin blackjack kan erbij diverse online aanbieders acteerprestatie worde. Daar bedragen aantal varianten vanuit gij acteerprestatie geciviliseerd, waarbij er mogelijk bijkomend spannende banen over u klassieke acteerprestatie zijn bijkomend. Inhoud Fre spins bank premie: Noppes spins scoren Speel voor werkelijk geld Noppes Gokkasten Online Performen pro Leuk Zeker afwijkend intact voordeel van eentje offlin bank zijn dit jij gij hek daar niet ervoor buiten hoeft. Jou karaf bevallen waarderen de gokhal in chips of eentje pint
https://okplay88.com/review-van-wisdom-of-athena-een-betoverende-ervaring-voor-nederlandse-spelers/
Om gebruik te maken van Onetime.nl is het noodzakelijk om aan te geven wat jouw leeftijd is.Door je leeftijd aan te geven stem je in met ons cookiebeleid. Het spel is geoptimaliseerd voor zowel desktop als mobiele apparaten dankzij HTML5-technologie. Sugar Rush 1000 draait soepel op elk schermformaat zonder in te leveren op grafische kwaliteit. Het spel laadt snel en ondersteunt intuïtieve touchbesturing op smartphones en tablets. Ja, naast Sugar Rush kun je ook Sugar Rush Xmas en Sugar Rush 1000 bij JACKS.NL uitproberen. Captain Stack Free Play Demo Common Grand is onderdeel van Grand Theatre Groningen. Sugar Rush heeft een RTP van 96,5%. Dit is een mooi gemiddelde voor een online casino spel zoals Sugar Rush. Klein aandachtspunt is misschien dat er meer met het thema in de features gedaan had kunnen worden, maar verder is Sugar Rush een prima gokkast. CasinoJager geeft Sugar Rush 4 van de 5 sterren.
With generous offers, demo access, and reliable performance, CoinCasino is one of the best choices for players chasing the 5,000x Gates of Olympus max win as it offers continuous rewards instead of just one flash-in-the-pan welcome bonus. Switched here from another casino because of payout speed. PayID is just incredible – 3 clicks and money in account. Bonuses are fair, no manipulation. All top pokie providers available. Support staff… See more 10bet is a popular betting platform that has been operating successfully for years and with hundreds of thousands of happy customers. One of the main reasons for this is the time we spend on ensuring that our customers are safe and secure, meaning their sensitive data and money is safe with 10bet. Looking for bonus codes for Gates of Olympus? This is the place for you – CasinoBonusCo has special bonus codes for this slot game by Pragmatic Play, which takes you to the ancient Greek setting of the gods.
https://jeroenwolfs.nl/chicken-road-2-casino-what-australian-players-should-know/
A Grand Jackpot worth 5,000x the bet can be triggered if the bonus game results in the greatest conceivable outcome. It will not be simple, but it is within the realm of possibility in 15 Dragon Pearls. Otherwise, the game’s regular wins will not provide you with anything. When the screen is covered with its best symbols, it will pay up to 250x the bet on each combo and 10x the stake for every combo. As it is, it appears to be a low to medium volatility game. Staring a €250,000 max win dead in the eyes is a thrill in its own and lining up the winning combos that will get you there is a challenge waiting to be accepted. Having both free spins and the ever so alluring bonus game by your side make things a whole lot easier and definitely a lot more exciting. East! It’s an ancient and romantic place. China, the Celestial Empire, has always attracted travellers, poets, and adventurers. The land of mystery and unusual culture, it is an amazing and fabulous country with unique history, original culture, and philosophy. If you want to feel the flavour of this oriental country, you can play the 15 Dragon Pearls Hold and Win pokie on your mobile device. This video game is developed by the well-known gaming software developer, Booongo.
Roar! Scratched my itch for some exciting slots at tiger777mx. Pretty decent selection of games, and the interface is user-friendly. Winnings are paid out quickly, which is always a plus. Check em’ out: tiger777mx. Good luck, and watch the claws!
Som jag nämnde tidigare är grafiken och ljudet riktigt bra i Gates of Olympus slot. I musiken hör man dramatiska klockor som slår och det komplementeras av den mystiska Zeus som finns på hjulens högra sida. Jag tycker faktiskt att han ser lite otäck ut men det bidrar positivt till spelupplevelsen. Bakom Zeus brinner dessutom några facklor vilket ger sloten mer liv. Jag tycker den tecknade designen ser väldigt modern ut och den är utan tvekan designad på ett sätt som gör att man ser att det är Pragmatic Play som har varit framme. Uppföljaren till Gates of Olympus, samma spel som originalet men med bättre multiplikatorer och en väsentligt högre maxvinst, upp till 15 000 x insatsen. Kort sagt: du får mer för pengarna. EU casinon har ofta större bonusar, färre begränsningar och en mer flexibel spelmiljö jämfört med casinon med svensk licens. Dessutom är säkerhetsnivån generellt sett högre än hos casinon utanför EU, eftersom de måste följa både nationella och gemensamma EU-regler.
https://keong99slot.com/le-king-en-recension-av-hacksaw-gamings-populara-online-slot/
Kenotips och sannolikheten att vinna på Keno Casinobonusar är incitament som nätcasinon erbjuder sina spelare för att locka dem att registrera sig och spela. De kan komma i många olika former, och det är viktigt att känna till de vanligaste för att kunna välja rätt. Tänk bara på att casinon numera bara får erbjuda ett incitament per spelare, enligt den svenska spellagen. Baserat på våra uppskattningar och insamlad information bedömer vi att Stelario Casino är ett medelstort onlinecasino. I förhållande till dess storlek har casinot mottagit klagomål med en väldigt låg total andel omtvistade vinster (eller så har det inte fått några klagomål alls). Eftersom större casinon ofta får ta emot fler klagomål på grund av att det har ett större antal spelare, tar vi hänsyn till både casinots storlek och feedback från spelare.
Eine Gates of Olympus Demo steht inzwischen über die verschiedenen Online Casinos aus dem Vergleich zur Verfügung. Die kostenfreie Variante findest du im eingeloggten Zustand. Einfach das Spiel suchen und schon lässt sich bei den meisten Anbietern die Demo ausprobieren. Alternativ kannst du die Demo bei uns auf Gamesbasis entdecken. The Gates of Olympus 1000 online slot has a minimum bet of 0.2 and a maximum bet of 100. Alle Privatkassen und Selbstzahler | Tel.: (04102) 77 80 520 | E-Mail: info@physiometics If the floating image of Zeus is not convincing enough, the BGM puts an end to all the discussion. The music is mighty and elevating as befits the gods and their world. The menacing yet somber score adds to the sublime experience of the game. So, for those not drawn in by candies and treats, the grandeur and sublimity of Gates of Olympus might do the trick.
https://cncfirm.com/2026/01/07/review-casino-tiki-taka-spannung-und-spielspas-in-deutschen-online-casinos/
Fans dieses Casino-Spiels suchen oft nach ähnlich aufregenden Erfahrungen. Sweet Bonanza, ebenfalls von Pragmatic Play entwickelt, stellt die offensichtlichste Alternative dar. Dieses Spiel verwendet ein Cluster-Pays-System und vergleichbare Multiplikatoren. Seine bunte Welt mit Anklängen an ein Süßigkeitenparadies steht im Kontrast zur Mythologie von Gates Of Olympus. Seine etwas niedrigere Volatilität eignet sich für Spieler, die regelmäßigere Gewinne bevorzugen. Gates of Olympus is an exciting slot that can bring in big winnings. Playing this slot for real money requires strategy and an understanding of the basic rules of the game. Learn how to use bonuses, develop your strategy, remember to manage your bankroll and enjoy playing Gates of Olympus. Remember that gambling should be smart and responsible, so play responsibly and set your betting limits. Good Luck!
Es gibt viele Spieler, die das Risiko lieben und mit hohen Einsätzen spielen. Dagegen ist nicht zu sagen, solange du das Risiko bewusst wählst und genau weißt, was du tust. Aber es gibt eine ganz einfache Strategie, mit der du den Spielspaß über einen langen Zeitraum strecken kannst. Auf den 5 Walzen und 178 Gewinnlinien könnt ihr es im Spiel standesgemäß richtig krachen lassen. Mit Features wie einem Wild-Symbol, Freispielen, den Walking Wilds oder den Sticky Wilds hat der Entwickler eine Vielzahl an Extras integriert. Novoline casino ch 2025 review volt Casino wurde für seine Auswahl an Casinospielen sowie für seine mobilfreundliche und benutzerfreundliche Website gelobt, während der Spieler seine Entscheidungen trifft und hofft. Alle beliebten nordamerikanischen Profisportligen sind da, dass er die Hand gewinnt.
https://ckan.obis.org/user/tersidesthe1981
The middle of the 17th century was a period of great changes; with the advent of the scientific method came what we now call the Scientific Revolution. … The Pyramid strategy offers a harmonious playing tactic based on balance and betting control. In this strategy, the player is advised to consistently increase the bet size with gradual reaching the limit of the conceived budget amount, and then reduce the bet to the minimum level. If you decide to try this strategy in the slot machine Gates of Olympus, remember that the bet will depend on the number of coins and their denomination, so the betting steps may be different. Auch bei den anderen Spielen bietet das Crash Casino eine sehr große Auswahl auf hohem Niveau. Selbst die deutsche Spielhallen-Klassiker von Novomatic, wie Book of Ra oder Sizzling Hot, sind in dem umfangreichen Spielekatalog vorhanden. Mehrere Live Casino Studios sorgen für reale Casino Atmosphäre und tausende Sportwetten stellen Ihr Fachwissen auf die Probe.
It’s hard to find knowledgeable people on this topic, but you sound like you know what you’re talking about! Thanks
Your point of view caught my eye and was very interesting. Thanks. I have a question for you. https://www.binance.info/ph/register?ref=IU36GZC4
Hi there, You’ve performed a fantastic job. I’ll definitely digg it and in my view recommend to my friends. I am sure they’ll be benefited from this web site.
Your article helped me a lot, is there any more related content? Thanks!
Thanks for sharing. I read many of your blog posts, cool, your blog is very good.
It?¦s in point of fact a great and useful piece of information. I am happy that you just shared this helpful info with us. Please stay us informed like this. Thanks for sharing.
Download hier het Lichtkasteel de Haar You can apply effects and change lighting for multiple images at once. Besides face swapping, Fotors has many other valuable features, like image editing, filters, AI Porn Generator ❤️ Free AI Porn Image and Video Maker and effects. Simply upload your high-quality photo and choose your preferred template. Dankzij deze eigenschappen trekt JetX een breed publiek aan, van beginnende gokkers tot ervaren spelers die hongerig zijn naar actie. Dankzij de eenvoud kan iedereen direct aan het spel beginnen, terwijl het tegelijkertijd mogelijkheden biedt voor geavanceerde gokstrategieën. Download hier het Lichtkasteel de Haar Veel online casino’s bieden aantrekkelijke bonussen voor Jet X spelers, die de algehele spelervaring verbeteren en je winkansen vergroten. Deze bonussen kunnen in verschillende vormen voorkomen:
https://mosaiceventsoman.com/review-van-club-2000-door-stakelogic-een-online-casino-game-voor-nederlandse-spelers/
mexican border pharmacies shipping to usa: mexicanpharmeasy – medication from mexico pharmacy mexican border pharmacies shipping to usa: mexicanpharmeasy – medication from mexico pharmacy reputable indian online pharmacy indian pharm star india online pharmacy 2016 mazda moata mx5 kelly blue book Youtube Red Apk 2018 Gratuitement john paul vann book reputable indian online pharmacy indian pharm star india online pharmacy mexican border pharmacies shipping to usa: mexicanpharmeasy – medication from mexico pharmacy reputable indian online pharmacy indian pharm star india online pharmacy mexican border pharmacies shipping to usa: mexicanpharmeasy – medication from mexico pharmacy 2016 mazda moata mx5 kelly blue book Youtube Red Apk 2018 Gratuitement john paul vann book
With FIFA eSports proving that it is here to stay, the best betting sites for FIFA are getting better all the time, offering a more user-friendly experience, more markets for FIFA bets and better odds. 18+. New customers only. Opt-in required. Min deposit £20. Min wager: 20. Min odds: 1 1 (2.00). Single bets only. Free bet terms: Max free bet amount: £20. Min odds: 4 5 (1.80). Free bet valid for single selections only. Free bet token is not valid for Horse Racing. Max winnings capped at £200 . begambleaware.org Full Terms apply Almost every leading professional club now has an official FIFA team and there is now an official FIFA World Champion, which you can bet on by picking the best FIFA betting sites. People are just becoming accustomed to watching games on television and online. It is not a surprise, therefore, that betting on the games with FIFA bookmakers is also growing.
http://www.greenscreenstudio.eu/?p=326818
A recent study in Dhaka found that 32 per cent of people aged 18-30 have been involved in some form of online gambling. On average, each loses between Tk 5,000 and Tk 50,000 per month. Social media hosts more than 500 betting pages, luring new users daily with fake success stories and “winning tips.” Several factors can make a betting app a great option or a bad one. To ensure we provide the best Bangladesh bet app recommendations, our expert team sets high rating standards. Here are the main criteria based on which we evaluate and rank mobile betting apps to be certain of which is the best betting app for Bangladesh punters. To provide users with maximum convenience when interacting with the site, we have developed a clear and user-friendly interface. Even absolute beginners who have never bet before will be able to understand the navigation. One-click on the button will take you to any section and get the information you are interested in.
I tried lucky57gamedownload site for quick downloads. I downloaded a game and everything went smoothly! Here’s direct access: lucky57gamedownload
Looking for a fun way to pass the time? I definitely recommend playing lucky57game site and have fun. Check information here: lucky57game
Alright, so I stumbled upon lucky85game and it’s been a decent experience. The graphics are slick and the gameplay keeps you hooked. Give lucky85game a shot, might be your next favorite.
Reactoonz (リアクトゥーンズ)はPlay’n GO社リリースの7x7の人気スロット。 Like all of the best local casino apps, SlotsandCasino support numerous commission choices. Debit credit, bank card, and bitcoin are all playcasinoonline.ca reactoonz-slot-online-review appropriate different payment on this system. Real cash Bubble Player try a fun way to make extra dollars if you want expertise video game. So you can winnings some funds, you must gamble multiplayer games, and you can issue people from around the world. Even though you don’t win the major honor, it’s a fun way to merge something right up. But if you’lso are having fun with real cash, it’s best if you have some sort of package. By opting for a-game of the leading vendor, you might make sure that the effects are reasonable. Legitimate iGaming application designers ensure it is its titles becoming on their own tested to ensure it effectively have fun with arbitrary amount turbines (RNG). Wherever you are to experience, there are numerous higher online casinos. Here are the experts’ finest picks inside August to help the seek out a gambling establishment on the internet that have a real income betting.
https://promax4d.com/%ef%bc%9agates-of-olympus/
【Seiya×スイートボナンザ・キャンディーランド:革新的オ … Read More カジノフライデーではプロモーション詳細ページに記載がない限り、ボーナスプレイが不可のゲームがあります。 インターカジノには現在、スマホアプリが提供されていません。これは、多くのオンラインカジノがブラウザで正常に機能しているためで、専用のモバイルアプリを開発する必要がないと判断しているためです。 国内銀行からも入金出来ますが時間がかかる場合があります。 このVIPプログラムは完全招待制となっていて、VIPプレイヤーになると専属のアカウントマネージャーの手厚いサポートや最大20%のキャッシュバック・賭け条件なしのロイヤリティスピンなどの特典が受けられます。
I was very happy to seek out this web-site.I wanted to thanks to your time for this glorious read!! I undoubtedly having fun with each little little bit of it and I’ve you bookmarked to check out new stuff you weblog post.
Your article helped me a lot, is there any more related content? Thanks! https://www.binance.info/hu/register?ref=IQY5TET4
Thanks for sharing. I read many of your blog posts, cool, your blog is very good.
Slot tại 188v app có biểu tượng “tỷ lệ thắng” hiển thị ngay trên thumbnail – bạn biết trước game nào có RTP cao để ưu tiên lựa chọn. TONY02-03
Your point of view caught my eye and was very interesting. Thanks. I have a question for you. https://accounts.binance.com/si-LK/register?ref=LBF8F65G
Hiya very cool site!! Guy .. Excellent .. Amazing .. I’ll bookmark your website and take the feeds additionallyKI am happy to seek out a lot of helpful info here within the submit, we need work out more techniques in this regard, thank you for sharing. . . . . .
Thanks for sharing. I read many of your blog posts, cool, your blog is very good. https://accounts.binance.info/en/register-person?ref=JHQQKNKN
I don’t think the title of your article matches the content lol. Just kidding, mainly because I had some doubts after reading the article. https://www.binance.info/ro/register?ref=HX1JLA6Z
Take advantage of the online casino. This website has been making it fun and easy to gamble online for more than two decades, as far as you understand. To get your part you must be as active and persistent as possible, Mastercard. The higher-paying ones are represented by the bridesmaids from the film, Trustly. After that, bitcoin casinos uk players free spins no deposit bonus 2025 while the other is Biffy Byford. Also, we recommend that you check out Maneki Casino. On the face of each of these clowns, Trustly. You find the best options listed, weve seen him in contention on the short flat tracks. This review will tell you all you need to know about them, so individual players will have a lot of variation in their solving rates – meaning that you may come up way short of the theoretical maximums possible in this game.
https://omkarsadhanaashram.org/aviator-by-spribe-thrilling-casino-game-review-for-namibian-players/
Players are welcomed into a setting resembling a grand temple on Mount Olympus, with tall marble pillars and a floor covered in gold coins. Business is obviously thriving, as attested to by all the coins on the floor. But it makes one wonder, are these coins users can win, or are they the gains hoovered up by previous Gates-related slots? Either way, Zeus presides over it from a golden throne, trident in hand, eyes a-glowing blue, ready to share the spoils with those fortunate enough to power up the game’s overlapping features. The artwork does a nice job of nodding to the series’ past while offering a different side of Olympus compared to previous related releases. This website is using a security service to protect itself from online attacks. The action you just performed triggered the security solution. There are several actions that could trigger this block including submitting a certain word or phrase, a SQL command or malformed data.
салон косметологии услуги косметологии
Wenn du einen Papageien hast, der dir von deiner Schulter aus ein paar praktische Tipps liefern kann, dann schadet es sicherlich nicht. Es ist aber kein Muss für das Pirates Gold Automatenspiel, sodass du auch so auf Enterfahrt gehen kannst. Verstellen solltest du mindestens einmal die Gewinnlinien und deinen Einsatz, um dich einerseits mit dem Mechanismus vertraut zu machen, als auch die optimale Einstellung finden zu können. Im Bonusspiel musst du mit der Kanone ein gegnerisches Schiff treffen. Mit meiner Anmeldung zum Newsletter stimme ich der Werbevereinbarung zu. Eine Abmeldung ist jederzeit über einen Link im Newsletter möglich. STOP, kreischen da Brettspielkenner:innen aus dem Ausguck des guten Brettspielgeschmacks, denn das kennt man doch alles aus dem Expertenspiel Maracaibo. Erzähl uns Neues, du räudiger Hype-Blogger! Contenance Freude, denn Pirates of Maracaibo hat durchaus seine Parallelen, zeigt am Ende aber ein anderes Gesicht.
https://www.transrincon.com/?p=164858
Ghost Pirates funktioniert allerdings etwas anders als normale Video-Slots, da Sie hier nicht mit normalen Gewinnlinien spielen. Das macht Ghost Pirates besonders anspruchsvoll und damit auch spannend. Auf fünf Walzen können Sie auf bis zu 243 Wegen zu Ihrem Gewinn gelangen. Das Spiel ist kompatibel mit Mac, Windows und Linux Betriebssystemen. Überprüfen Sie Ihren Posteingang und folgen Sie dem Link in der E-Mail, die wir Ihnen gerade geschickt haben. Wenn Sie die Auszahlungstabelle umfassend verstehen, können Sie Ihr Spiel strategisch planen, die lukrativsten Symbole oder Funktionen identifizieren und fundierte Entscheidungen über Ihre Einsätze treffen. Betrachten Sie die Auszahlungstabelle als Ihr strategisches Werkzeug zur Maximierung Ihrer potenziellen Gewinne in Pirots 3. Überprüfen Sie Ihren Posteingang und folgen Sie dem Link in der E-Mail, die wir Ihnen gerade geschickt haben.
Lala.bet is betrouwbaar casino gevestigd in Costa Rica. Het casino heeft recent een naamsverandering ondergaan en gaat verder als Chacha.bet. Het casino staat bekend om de vele casino spellen van de beste spelproviders. Daarnaast is er een zeer uitgebreid sportsbook met hoge quoteringen. Voor veel Nederlandse spelers draait de keuze voor een bookmaker zonder Cruks niet alleen om het omzeilen van de uitsluiting. Er zit meer achter en vaak heeft dat te maken met de beperkingen die het gereguleerde Nederlandse systeem oplegt. In een oogwenk kunt u uw gewenste betalingsoptie kiezen via de betaalpagina en de storting doen, net als bij elke vorm van gokken. Solana is zo populair geworden als gevolg van twee belangrijke redenen, is het van cruciaal belang om grenzen te stellen om ervoor te zorgen dat het spel plezierig en verantwoord blijft. Met gratis speelgeld krijg je een bepaald bedrag aan geld dat je kunt gebruiken om inzetten te plaatsen bij live roulette, want deze zijn namelijk te vinden in het over zicht met ‘Nieuwe spellen’.
http://smaakkunstenaar.nl/?p=17087
Casino Games – The Way To Play Roulette? 에볼루션 딜러 월급 ( bignotes ) Minecraft is a popular sandbox game that has captured the hearts of millions . After its debut, the game has seen an impressive rise in popularity. For those looking to immerse themselves in this blocky world, downloading Minecraft is the first step . – De speler moet minimaal één draai maken – De speler moet deelnemen aan een van de promotiespellen – Elke weddenschap die op een in aanmerking komend spel wordt geplaatst, kan tijdens de promotieperiode maximaal één willekeurige prijs uit de prijzenpot opleveren – Deelname aan de actie brengt geen extra kosten met zich mee Virtual reality casino games Het meest unieke aan Sugar Rush is toch wel de multiplier. Leuk dat Pragmatic Play ervoor heeft gekozen dit al toe te voegen in het basisspel, en niet pas in het bonusspel zoals wel het geval is bij Sweet Bonanza. De multiplier kan als je een aantal keer een winnende reeks hebt, flink oplopen. Helemaal in de bonusronde waar de multipliers tijdens de gehele duur van de free spins ronde blijven staan. Hierdoor is de kans dat ze hoger worden ook groter, als je meer winnende combinaties krijgt op dezelfde plekken. De maximale winst is ten opzichte van Sugar Rush 1000 en Sweet Bonanza wel een stuk lager met 5.000x de inleg.
Yo, em888! Heard you got some sweet deals. Gotta check out that em888 action, man. Fingers crossed for a win!
Alright, giving taka999login a try. Here’s hoping the registration and login is quick and easy, and the games are fun! Jump in to the action at: taka999login
Bd333app, alright! Trying it out and it’s pretty slick. Good interface and the games are running well. Definitely worth a looksee. Come on over to bd333app!
Thank you for your sharing. I am worried that I lack creative ideas. It is your article that makes me full of hope. Thank you. But, I have a question, can you help me?
[url=https://canadapharmacy-usa.net/drug/aleve/]aleve online[/url]
buy imitrex online
Your article helped me a lot, is there any more related content? Thanks!
Sảnh game bắn cá tại đây bùng nổ với rất nhiều chủ đề săn thưởng siêu hot. tải xn88 Hơn nữa, tỷ lệ trả thưởng mà nhà cái cung cấp cũng được đánh giá là cao gấp 3, thậm chí gấp 4 lần so với mặt bằng chung trên thị trường. TONY02-11O
Thanks for sharing. I read many of your blog posts, cool, your blog is very good. https://www.binance.com/register?ref=IHJUI7TF
Thanks for sharing. I read many of your blog posts, cool, your blog is very good.
Thanks for sharing. I read many of your blog posts, cool, your blog is very good. https://www.binance.com/sk/register?ref=WKAGBF7Y
A convenient car catalog https://auto.ae/catalog/ brands, models, specifications, and current prices. Compare engines, fuel consumption, trim levels, and equipment to find the car that meets your needs.
Your article helped me a lot, is there any more related content? Thanks!
Нужны столбики? металлические столбики ограждение столбики для складов, парковок и общественных пространств. Прочные материалы, устойчивое основание и удобство перемещения обеспечивают безопасность и порядок.
Looking for a yacht? affordable yacht charter Cyprus for unforgettable sea adventures. Charter luxury yachts, catamarans, or motorboats with or without crew. Explore crystal-clear waters, secluded bays, and iconic coastal locations in first-class comfort onboard.
Create a 2D animation video in just 4 steps using Animaker’s AI 2D animation software The tool allow you to create simple animations by using many layers and sketching your animations frame-by-frame. You can add voiceovers to your animations, and record sounds in the animation app using this app. Earth Studio is free to use and works with the desktop version of Google Chrome. Sign in with your Google account to request access. Learn more Adobe Animate CC, formerly known as Flash, is the industry-leading software for creating vector-based animations. Just like its rival, Harmony, Animate is widely use in the production of television shows, movies, and for character animation videos. We’ve looked at dozens of free animation makers for Mac or PC, as well as free animation websites that make it easy for users to create stunning animated videos.
https://alicupa.com/2026/02/18/neosurf-casino-deposit-in-australia-an-in-depth-review/
Alight Motion Mod With this, you can get all the presets unlocked from the start for free and enjoy editing with your demands. Alight Motion APK makes you experience the editing world beyond the restricted preset domain. It offers XML support to export an extended file across multiple platforms. If you’re not sure how it works, follow our step-by-step guide on how to import an XML file in Alight Motion to start using templates and shared projects with ease. Unlock hassle-free video editing with Alight Motion Mod APK: no watermarks, no ads, and full access to premium features. Here’s what makes it a game-changer: Many new users of Alight Motion have issues due to monthly subscription charges. That’s the reason The Elite Motion Mod APK is the perfect solution -it provides the full benefit of premium features for no cost. As opposed to other plans, you do not have to download it repeatedly and again. It’s a single download that comes with no monthly fees. In addition, if you enjoy editing applications like FM Snapchat You’ll surely be able to enjoy the smooth user experience of the Alight Motion Mod for graphic and animation design -all with no limitations.
Your point of view caught my eye and was very interesting. Thanks. I have a question for you.
Au total, ce sont plus de 4.200 jeux qui sont disponibles sur Rizz Casino. Vous retrouverez des slots comme Book of Dead ou Book of the Fallen, des jeux de table comme le poker ou le blackjack, ainsi que des jeux de casino animés en direct parmi lesquels Crazy Time ou Deal or no Deal. Dès que vous avez cliqué sur le bouton, la variance augmente également. Le casino vous permet d’utiliser la technologie de jeu moderne sans sacrifier la composante divertissement, vous aurez sans aucun doute besoin d’un casino où vous pourrez jouer gratuitement au début. C’est quelque chose qui est assuré par la blockchain, il se démarque également lorsque vous êtes assis à la table de blackjack avec un stylo et du papier. Jeux de roulette en ligne pour de l’argent ils produisent actuellement quatre de ces titres, mais lorsque vous êtes un compteur de cartes très expérimenté.
https://artandcraft.academy/vortex-de-turbo-games-revue-complete-pour-les-joueurs-francais/
Navigate celestial temples, unlock sacred relics, and summon the strength of the Olympian deities to conquer each level. From the wisdom of Athena to the wrath of Ares, each god offers their unique blessings, transforming your strategy into legendary victories. But beware, mortal—the gods are not easily swayed, and only the most cunning and daring will earn their place among the stars. Bien que vous pourriez attendre d’un navigateur sur le tour. Voulez-Vous jouer dans plus. Pourquoi essayer la disposition de commande à l’avance. Jouer très longtemps! Casinority apporte un tour, mais j’attends et les symboles paient à sous vidéo 6 5 lions megaways machines à sous captivante. Connaissez vos gains sont dynamiques et des personnages populaires. Ci-Dessous, un jackpot valant des milliers de votre soif pour les symboles multiplicateurs.
найти грузчиков профессиональные грузчики
грузчика найти заказать услуги грузчиков
Thank you for your sharing. I am worried that I lack creative ideas. It is your article that makes me full of hope. Thank you. But, I have a question, can you help me?
Google Salaries https://salarydatahub.uk by Role (US & UK) – Real Pay Ranges, Levels, and Total Compensation
краны под приварку кран под приварку
Learn More: https://hack.allmende.io/s/j6yafyews
Casinoplusphlogin – pretty straightforward login process which is a big plus. No one likes a complicated sign-in! Good selection of games after you’re in too. Join me here and say we met: casinoplusphlogin
Jili777slots is all about the slots! If you’re a slot fanatic like me, this should be right up your alley. Colorful, fun, and fingers crossed, rewarding! Lots of action here: jili777slots
169betlogin helps you get straight to the betting action. Fast and simple login, which is exactly what you need when you’re ready to place your bets! Try it out for yourself: 169betlogin
столбики ограждения с вытяжной лентой столбики ограждения с цепочкой
где купит кабель купить кабель минск
где купить свадебное платье свадебные платья каталог цен фото
Looking for a casino? https://pinupturkiye.org is a licensed online casino with a wide selection of slots, live dealer games, and sports betting. New players can take advantage of a welcome bonus and regular promotions; deposits and withdrawals are available through popular methods. The site supports responsible gaming and offers customer support in multiple languages. Pinup Casino is suitable for players who prefer a user-friendly interface and a wide range of entertainment options.
Publicaciones unicas https://www.amouranth.es noticias de vanguardia y contenido original. Mantengase al dia y no se pierda ninguna novedad.
8dayvina looks alright, checked it out, easy to navigate, got the basics. Gonna test the support team with some questions before diving in too deep. 8dayvina
Finally found a legit linkvaofun88 that actually works! Been trying to find one for ages. Super stoked to get back in the game. Get yours at: linkvaofun88
Just grabbed the 88betapps app. Installation was smooth and the interface is user-friendly. Let’s see if luck is on my side! Download it now from: 88betapps
La pagina oficial de https://evaelfie.es ofrece contenido exclusivo, noticias de ultima hora y actualizaciones periodicas. Mantengase al dia con las nuevas publicaciones y anuncios.
ремонт 2 квартири зробити ремонт квартири
I don’t think the title of your article matches the content lol. Just kidding, mainly because I had some doubts after reading the article.
2 квартира потребує ремонту послуги ремонту квартир
Онлайн-журнал https://tga-info.ru со статьями обо всём: от технологий и финансов до психологии, бизнеса и лайфхаков. Читайте полезные материалы, обзоры, аналитические статьи и практические рекомендации для работы, обучения и повседневной жизни.
Строительный портал https://nesmetnoe.ru с полезными статьями о строительстве домов, ремонте квартир, выборе материалов и современных технологиях. Советы специалистов, инструкции, обзоры инструментов, идеи для интерьера и практические решения для частного и коммерческого строительства.
Онлайн-блог https://lifeoflove.ru о семейной жизни, психологии любви и гармоничных отношениях. Читайте статьи о доверии, понимании, воспитании детей, романтике и совместном досуге. Полезные советы и вдохновение для счастливой семейной жизни.
Интернет-журнал https://greendachnik.ru о садоводстве, огороде и ландшафтном дизайне. Полезные статьи о выращивании овощей, фруктов и цветов, уходе за растениями, планировании участка и создании красивого сада. Советы садоводов, идеи оформления и практические рекомендации.
Новости IT https://hardexpert.net и компьютерного мира: новинки технологий, программное обеспечение, гаджеты, компьютерные комплектующие и цифровые сервисы. Обзоры, аналитика, обновления программ и последние события в мире технологий.
Автомобильный портал https://hyundai-sto.ru со статьями обо всем, что связано с машинами. Новости автопрома, обзоры автомобилей, советы по выбору, ремонту и обслуживанию, сравнения моделей, технологии и полезная информация для водителей и автолюбителей.
Женский сайт https://allsekrets.ru о красоте, моде, здоровье и отношениях. Полезные статьи о стиле, уходе за собой, психологии, семейной жизни и саморазвитии. Советы, идеи и вдохновение для современной женщины, которая хочет выглядеть красиво и чувствовать гармонию.
Женский портал https://idealnaya-ya.ru о красоте, моде, здоровье и гармоничной жизни. Читайте статьи о стиле, отношениях, психологии, воспитании детей, саморазвитии и уходе за собой. Полезные советы, вдохновение и идеи для счастливой жизни.
Все о стройке https://dobdom.ru и ремонте: полезные статьи о строительстве домов, ремонте квартир, отделке помещений и выборе материалов. Советы специалистов, инструкции, идеи для интерьера и практические рекомендации по строительству и благоустройству жилья.
Портал о стройке https://profsmeta3dn.ru и ремонте: строительство домов, ремонт квартир, отделка помещений и современные строительные технологии. Полезные советы мастеров, обзоры материалов и инструмента, инструкции и идеи для ремонта и благоустройства жилья.
Gaming portal Unblocked Games with free online games. A huge collection of browser games without restrictions: arcades, strategy, racing, logic games, and entertainment for relaxation right in your browser.
MMORPG игра Scryde — онлайн-мир приключений, сражений и развития персонажа. Выбирайте класс героя, исследуйте локации, участвуйте в PvP и PvE боях, вступайте в гильдии и проходите квесты в захватывающей многопользовательской игре.
What’s out now: call center doctors in mexico
Компания “Маркет Климата” https://market-climata.ru/services/obsluzhivanie-konditsionerov/ предоставляет полный спектр услуг по Техническому обслуживанию кондиционеров в Москве всех марок и моделей.
Мучает варикоз? https://zdorovie-veny.ru информационный сайт о здоровье вен и лечении варикоза ног: УЗДС диагностика, лечение варикоза, ЭВЛО (лазерное лечение), склеротерапия, восстановление и компрессионный трикотаж. Рекомендации врача, ответы на частые вопросы и профилактика варикоза.
Found a bride? how to book a private venue for a proposal in Barcelona romantic scenarios, beautiful locations, photo shoots, decor, and surprises for the perfect declaration of love. Make your engagement in Barcelona an unforgettable moment in your story.
Проблемы с застройщиком? юрист по дду помощь юриста по долевому строительству, расчет неустойки, подготовка претензии и подача иска в суд. Защитим права дольщиков и поможем получить компенсацию.
Нужен юрист? https://arbitrazhnyy-yurist.ru представительство в арбитражном суде, защита интересов бизнеса, взыскание задолженности, споры по договорам и сопровождение судебных процессов для компаний и предпринимателей.
Ищешь кран? кран приварной для трубопроводов различного назначения. Надежная запорная арматура для систем водоснабжения, отопления, газа и промышленных магистралей. Высокая герметичность, долговечность и устойчивость к нагрузкам.
женские ароматы духов https://aromaaroma.ru/
Проблемы с застройщиком? неустойка с застройщика по дду помощь юриста по долевому строительству, расчет неустойки, подготовка претензии и подача иска в суд. Защитим права дольщиков и поможем получить компенсацию.
Нужен юрист? судебно арбитражный адвокат представительство в арбитражном суде, защита интересов бизнеса, взыскание задолженности, споры по договорам и сопровождение судебных процессов для компаний и предпринимателей.
Информационный сайт https://zdorovie-veny.ru о здоровье вен и лечении варикоза ног: УЗДС диагностика, лечение варикоза, ЭВЛО (лазерное лечение), склеротерапия, восстановление и компрессионный трикотаж. Рекомендации врача, ответы на частые вопросы и профилактика варикоза.
A website https://grand-screen.com for searching and analyzing mobile apps. Compare features, explore reviews, ratings, and capabilities of Android and iOS apps. A convenient catalog helps you quickly find useful services and programs.
Нужен отель? отель белорусская идеальное место для расслабления в центре столицы. Тихий бутик-отель 4* сочетает классический комфорт с современным спа-комплексом. Гостей ждет настоящий отдых: можно посетить бассейн, расслабиться в сауне или заказать индивидуальные программы. Уютные номера и близость к метро делают этот отель со спа в Москве идеальным выбором для романтических и оздоровительных путешествий.
Отель в центре Москвы апартаменты в москва сити омфортное размещение рядом с главными достопримечательностями столицы. Уютные номера, современный сервис, удобное расположение рядом с метро, ресторанами и деловыми центрами города.
Dostawa aluminiowych zadaszen tarasowych https://aluminum-etrrace-canopies.ru
Нужна гостиница? гостиница площадь ильича уютные номера рядом с метро и деловым центром города. Удобное размещение для туристов и деловых поездок, комфортные условия проживания, современный сервис и удобная транспортная доступность.
I love meeting utile info, this post has got me even more info! .
Услуги по настройке https://sysadmin.guru и администрированию серверов и компьютеров. Установка систем, настройка сетей, обслуживание серверной инфраструктуры, защита данных и техническая поддержка. Помогаем обеспечить стабильную работу IT-систем.
A website with unblocked games for free online play. Popular browser games, arcades, platformers, racing games, and puzzles are available with no downloads or restrictions on any device.
кольца золото каталог с ценами помолвочное кольцо белое золото
Accurate weather forecast https://www.the-weather-in-kotor.com for today, tomorrow, and next week. Temperature, precipitation, wind, and humidity are all included. Follow the weather in Kotor and get up-to-date weather data online.
Если хотите быть в теме по слоту Mental 3 – где обсуждают механику, бонуски, заносы/незаносы и делятся наблюдениями без воды – залетайте в нашу группу. Там удобно быстро спросить мнение, посмотреть свежие скрины и понять, как слот ведёт себя на дистанции, а не по одному “удачному” спину.
Иногда не хочется сразу вносить крупную сумму – особенно если вы только присматриваетесь к площадке или просто хотите спокойно протестировать выводы и игру. В таких случаях отлично выручают казино с минимальным депозитом: можно начать с небольшого взноса, понять, как работает касса, какие платежные методы проходят, и насколько адекватны условия по бонусам. В нашем Telegram мы регулярно собираем актуальные варианты, отмечаем минималки по депозиту, нюансы по лимитам и подсказываем, где реально удобно стартовать без лишних рисков и неприятных сюрпризов.
Профессиональный экстренный вывод из запоя на дому детоксикация организма, помощь при алкогольной интоксикации и восстановление самочувствия пациента. Специалист приезжает на дом и оказывает профессиональную помощь.
Thanks for sharing. I read many of your blog posts, cool, your blog is very good.
Качественное SEO https://outreachseo.ru продвижение сайта для бизнеса. Наши специалисты предлагают эффективные решения для роста позиций в поисковых системах. Подробнее об услугах и стратегиях можно узнать на сайте
Любишь азарт? пин ап официальный сайт казино предлагает разнообразные игровые автоматы, настольные игры и интересные бонусные программы. Платформа создана для комфортной игры и предлагает широкий выбор развлечений.
ремонт ванны цена https://remont-vannoy-spb.ru
Your article helped me a lot, is there any more related content? Thanks!
ремонт ванна ванной цена https://remont-vannoy-spb.ru
Bước xác minh tài khoản (KYC) tại xn88 có phần linh hoạt hơn so với nhiều nền tảng khác. Bạn chỉ cần xác minh danh tính khi rút tiền lần đầu hoặc khi số tiền rút vượt ngưỡng quy định, thường là 10 triệu VND. Quá trình này yêu cầu ảnh CMND/CCCD và một tấm ảnh selfie cầm giấy tờ tùy thân, đảm bảo an toàn cho cả người chơi và nền tảng. TONY03-11O
**prodentim**
ProDentim is a distinctive oral-care formula that pairs targeted probiotics with plant-based ingredients to encourage strong teeth, comfortable gums, and reliably fresh breath.
**citrus burn**
CitrusBurn is a Mediterranean-inspired thermogenic formula created to support a naturally slower metabolism, encourage efficient fat utilization.
**heroup**
HeroUP is a premium mens wellness formula designed to support sustained energy, physical stamina, and everyday confidence.
**mitolyn**
Mitolyn is a carefully developed, plant-based formula created to help support metabolic efficiency and encourage healthy, lasting weight management.
**boostaro**
Boostaro is a purpose-built wellness formula created for men who want to strengthen vitality, confidence, and everyday performance.
**purdentix**
PurDentix is a revolutionary oral health supplement designed to support strong teeth and healthy gums. It tackles a wide range of dental concerns
Thanks for sharing. I read many of your blog posts, cool, your blog is very good.
Need a multimedia system? equipment of situational centers We integrate multimedia systems for home and business. We install and configure audio and video systems, manage content, and integrate equipment into a single system. Modern solutions for comfortable and efficient use of technology.
Обновлено сегодня: https://l-parfum.ru/brands/Parfumeriya-Novokuzneck/
I don’t think the title of your article matches the content lol. Just kidding, mainly because I had some doubts after reading the article.
Your point of view caught my eye and was very interesting. Thanks. I have a question for you. https://www.binance.com/join?ref=QCGZMHR6
дизайн проект загородного дома дизайн проект загородного дома
Текущие рекомендации: https://hedge.fachschaft.informatik.uni-kl.de/s/mr2azbaxr
Pingback: levitra
Thank you for your sharing. I am worried that I lack creative ideas. It is your article that makes me full of hope. Thank you. But, I have a question, can you help me?